API-First & UI-Smart Testing
Introduction
TuringOne is an intelligent test automation platform designed to create, generate, execute, and analyze API, UI, and security tests directly from existing functional and technical documentation.
TuringOne positions itself as a true testing copilot: it goes beyond script execution by understanding business intent, structuring test scenarios, detecting change impacts, and delivering actionable, AI-driven recommendations.
Who Is TuringOne For
TuringOne is designed to meet the needs of multiple roles throughout the entire lifecycle of an application project.
Target Profiles
-
Product Owners / Business Analysts
- Validate functional coverage
- Ensure requirements are properly tested
- Visualize the impact of changes
-
QA / Test Engineers
- Rapidly generate API and UI test cases
- Build End-to-End test scenarios
- Execute and analyze test campaigns
-
Developers
- Validate APIs from the design phase
- Quickly detect regressions
- Collaborate efficiently with QA teams
-
Security Engineers / DevSecOps
- Run API security tests
- Identify vulnerabilities
- Leverage AI-driven recommendations
-
Managers / IT Leaders
- Track quality indicators
- Measure coverage and risks
- Support informed decision-making
What TuringOne Enables
TuringOne centralizes all testing-related activities into a single, AI-driven platform.
Key Capabilities
-
Understand documentation
- Functional document analysis
- Reading and interpreting User Stories
-
Automatically link artifacts
- User Stories ↔ APIs
- Documentation ↔ Endpoints
- Tests ↔ Requirements
-
Generate and execute intelligent tests
- Positive and negative API tests
- End-to-End scenarios
- UI tests based on real user journeys
-
Analyze security
- API vulnerability detection
- Actionable recommendations
-
Provide visibility
- Clear reports
- Quality indicators
- AI-driven recommendations
Key Concepts
To use TuringOne effectively, it is essential to understand its core concepts.
Project
A project represents an application or a functional domain. It groups together:
- documentation
- APIs
- scenarios
- test plans
- reports
API
An API corresponds to an endpoint defined from a Swagger / OpenAPI specification. It includes:
- the method (GET, POST, etc.)
- parameters
- expected responses
- security rules
Feature
A feature represents a business functionality, usually aligned with a User Story or an Epic.
Scenario
A scenario is a logical sequence of API, UI, or hybrid actions. Scenarios can share and reuse data between steps.
Typical User Journey
A user generally follows the journey below:
- Project creation
- Import of documentation and User Stories
- Import of Swagger / APIs
- Intelligent synchronization
- API test generation
- Creation of End-to-End scenarios
- Creation of a test plan
- Execution of UI & security tests
- Analysis of reports and recommendations
- Change management
2. Quick Start
This chapter aims to help new users get started with TuringOne in just a few minutes, from signing in to the application to gaining a high-level understanding of the available modules.
The approach is deliberately progressive: each step builds on the previous one to ensure a smooth and efficient learning curve.
2.1 Signing in to the Application
To start using TuringOne, the user must sign in to the application via a web browser.
Sign-in Steps
- Open the TuringOne application URL
-
Enter:
- the username (email address or username)
- the password
- Click Sign in
Depending on the organization’s configuration, authentication can be:
- Standard SaaS authentication (username / password)
- via an identity provider (SSO)
After successful authentication, the user is automatically redirected to the main application workspace.
- Use a modern browser (Chrome, Edge, Firefox)
- Do not share your credentials
- Sign out after a session on a shared device

2.2 Access to the Dashboard
Once logged in, the user accesses the main dashboard of TuringOne.
The dashboard serves as the central entry point to all the platform’s features.
Dashboard Content
- View existing projects
- Create a new project
-
Quickly access the most recently used items:
- recent projects
- recent scenarios
- recent reports
Dashboard Objectives
- Provide a high-level overview of activity
- Reduce navigation time
2.3 Modules Overview
TuringOne is structured into functional modules, accessible from the main menu.
Each module corresponds to a key stage in the testing lifecycle.
Main Modules for a Project
-
Projects
- Project creation and management
- Global configuration
- Access to project data
-
Documentation & User Stories
- Document import
- Functional requirement management
- AI-driven analysis
-
APIs
- Swagger / OpenAPI import
- Endpoint visualization
- Intelligent synchronization
-
API Tests
- Automatic test generation
- Test campaign execution
- Result analysis
-
End-to-End API Scenarios
- API workflow creation
- Data sharing between steps
-
UI Tests
- UI feature and scenario creation
- Automated execution
- Visual results
-
API Security
- Security testing
- Vulnerability detection
- AI recommendations
-
Test Plans
- Test plan creation
- Test case execution
-
Reporting
- Consolidated reports
- Quality indicators
- Decision support
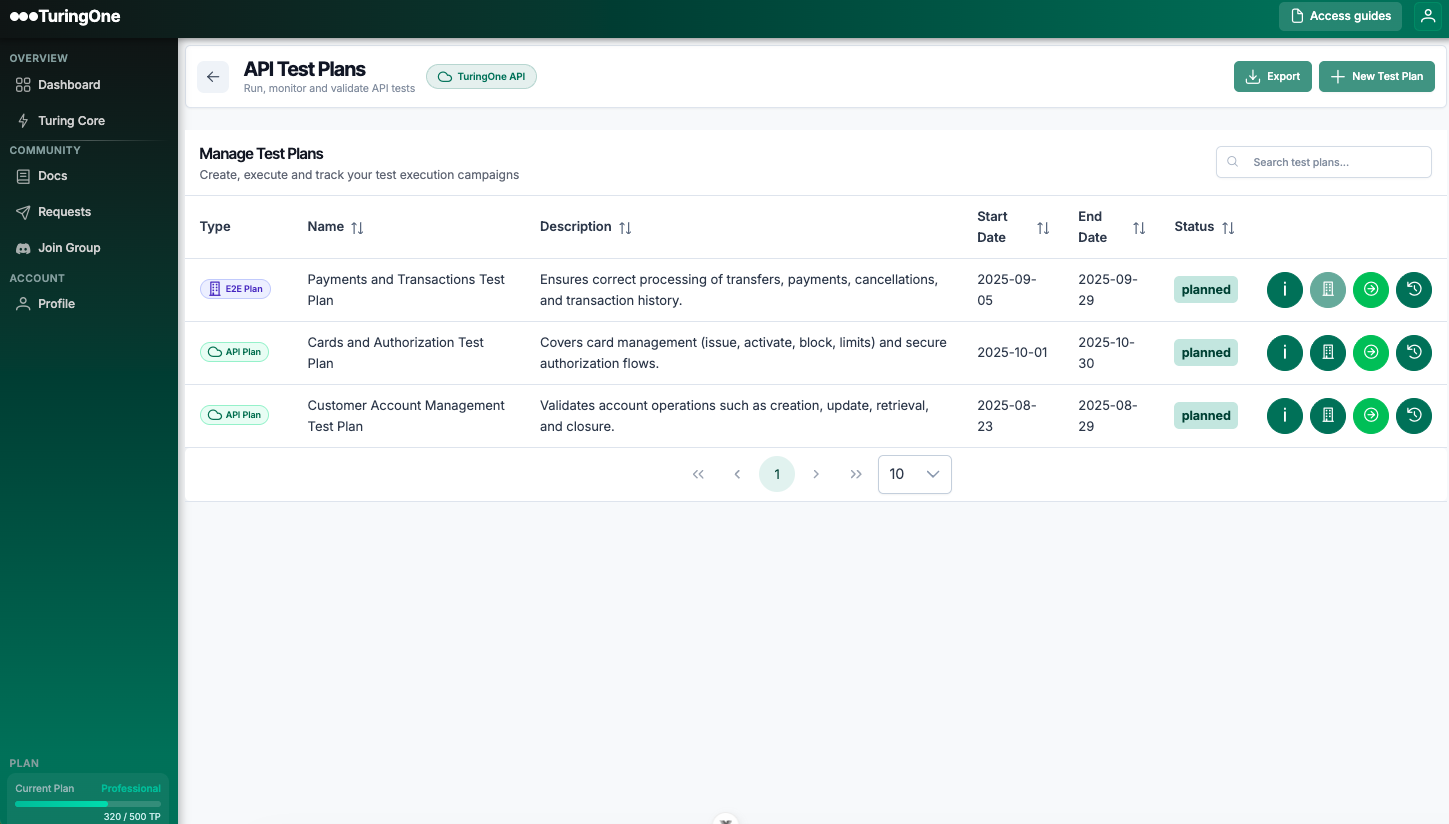
3. Project Management
Project management is the starting point for any use of TuringOne.
A project allows you to structure all elements: documentation, APIs, tests, scenarios, security, test plans, and reporting.
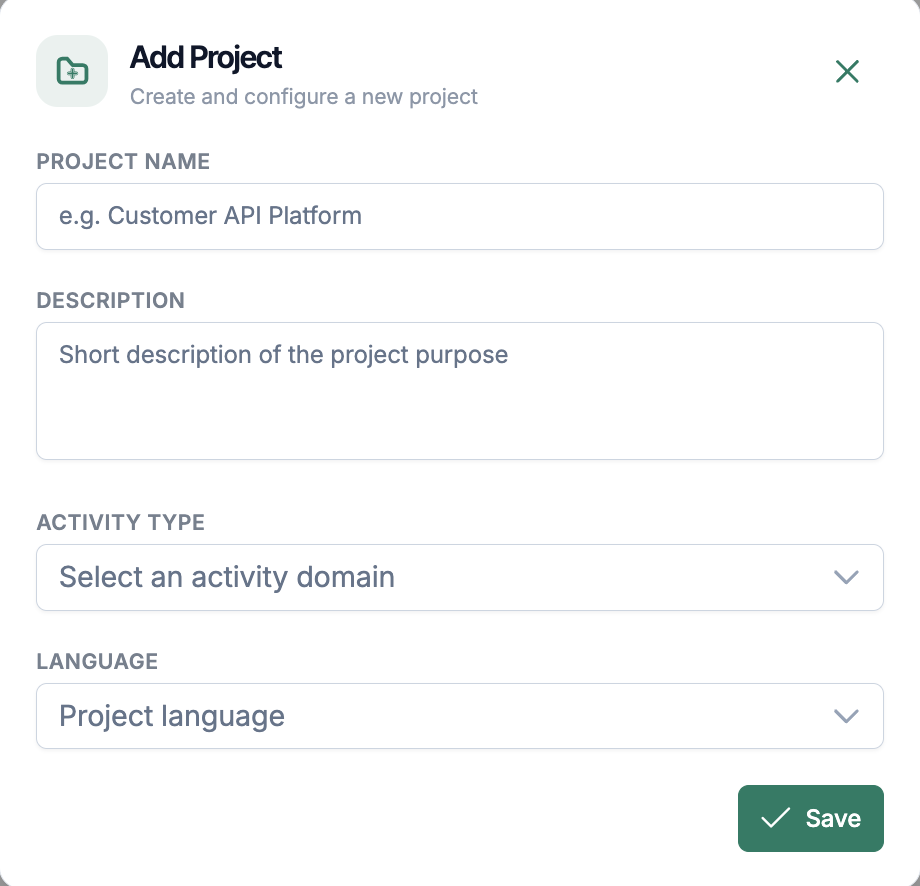
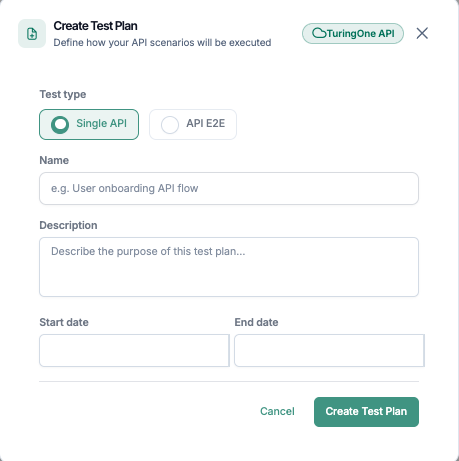
3.1 Create a Project
Project creation is intentionally fast and guided, allowing users to get started without complexity.
Steps to Create a Project
- From TuringOne Core, click New project
- Fill in the required information
- Confirm the creation
Fields to Complete
| Project Name | |
| Description |
A short description helps to:
|
| Activity Type |
The project domain helps guide how the AI model is used:
Banking, Insurance, Health, ERP, … The project type can evolve over time depending on needs. |
| Language |
The selected language is used by the AI to:
|
- the project is created immediately
- the user is redirected to the project workspace
- the modules become accessible
3.2 Paramètres du projet
Une fois le projet créé, l’utilisateur peut accéder aux paramètres du projet (Settings) afin de l’adapter à son contexte technique et organisationnel.

3.2.1 General Information
General information includes:
- Project name
- Description
- Project status
This information serves as a shared reference for all project users.

3.3 Project Best Practices
To get the most out of TuringOne, it is recommended to follow certain project structuring best practices.
One project = one coherent functional scope
It is recommended to create one project per:
- application
- business domain
- or product
This enables:
- better readability
- more relevant AI analyses
- simplified maintenance
- overly broad projects
- mixing unrelated functional domains
4. Technical Configuration
Technical configuration allows TuringOne to be adapted to the project’s real environment. It is an essential step to ensure reliable, secure, and executable tests across different contexts (DEV, UAT, PRE-PROD, etc.).
4.1 Connection to External Tools
TuringOne can connect to third-party tools in order to integrate into the existing ecosystem.
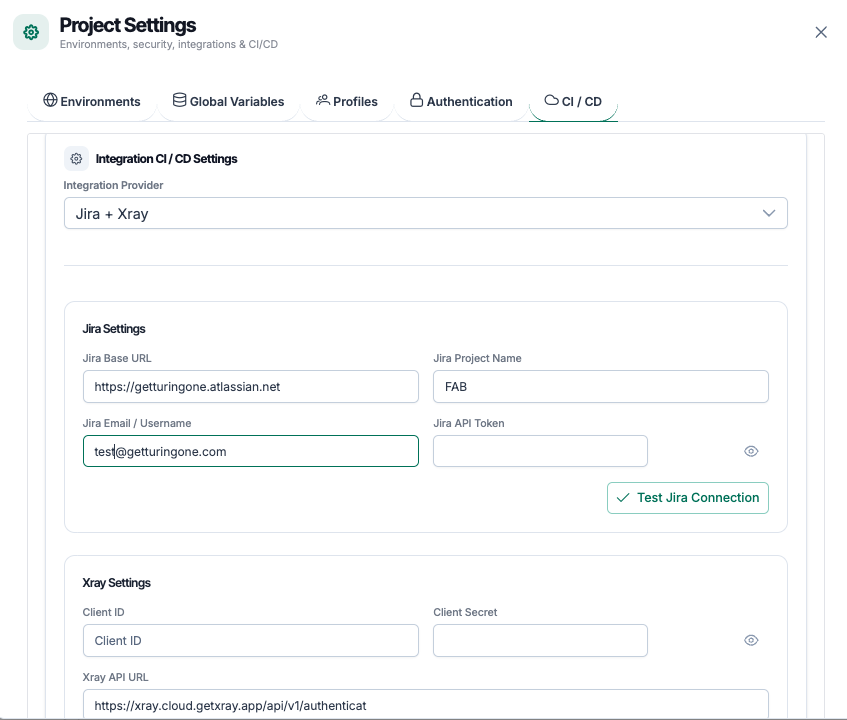
4.1.1 Connection to Atlassian Jira (Cloud)
This integration makes it possible to:
- import User Stories
- synchronize functional requirements
- export test results
- ensure end-to-end traceability Requirements ↔ Tests
Configuration Steps
This guide provides the necessary details to quickly and securely connect your Jira Cloud instance to TuringOne, enabling automation of requirement analysis and test case linkage.
Updated over a month ago
This integration setup is for Atlassian Jira Cloud only. If your setup is not Cloud (Server or Data Center), this integration is not supported.
How does TuringOne leverage this integration?
Connecting to Jira allows TuringOne to integrate directly into your development and QA workflow, transforming requirements into actionable testing assets:
- Contextual Analysis: TuringOne reads your user stories, tasks, and issues from Jira to gain the necessary business context for accurate generation.
- Test Case Linkage: Allows TuringOne to link newly generated test cases and automation scripts back to the original Jira issue for full traceability.
- Efficient Reporting: Provides a clear, promptable link between generated testing assets and the original work item in Jira.
Information Required from Your Jira Account
To establish a secure, plug-and-play connection, we require three pieces of information, plus a secure API key/token.
| Required Detail | Explanation | Example Value |
|---|---|---|
| Cloud Instance URL | The base URL of your Atlassian Cloud site. | https://<CUSTOMERNAME>.atlassian.net |
| Username (Email) | The email address associated with the account used to generate the API key. | username@company.com |
| API Key / Token | A secure token generated in your Atlassian settings (Classic or Scoped). |
2.1 Retrieving the Cloud ID (If using Scoped Tokens)
If you choose to use the recommended Scoped Token, you may need to provide your Cloud ID for API calls. This is retrieved via a cURL command:
Encode Credentials:
Combine your username:apiKey into a single string
(e.g., email@domain.com:123456789). Use a Base64 encoding tool
(e.g., https://www.base64encode.org/)
to convert this string into a Base64 encoded value.
Run cURL Command:
Execute the following cURL command, replacing the placeholders with your URL and
encrypted credentials:
curl --location 'https://<CUSTOMERNAME>.atlassian.net/_edge/tenant_info' \
--header 'Authorization: Basic <base64-of-email:apiKey>'
You can use Postman for this step, which automatically handles the Base64 encryption.
https://learning.postman.com/docs/getting-started/importing-and-exporting/importing-curl-commands/
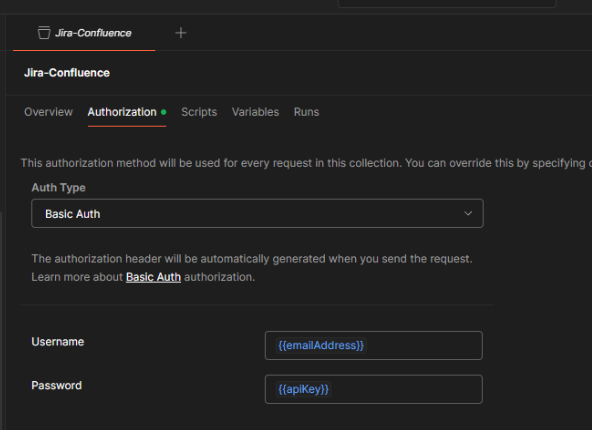
Keep in mind that if you do the basic authentication in Postman itself, it will automatically encrypt the information in Base64. See below screenshot:
3. Setting up the API Key
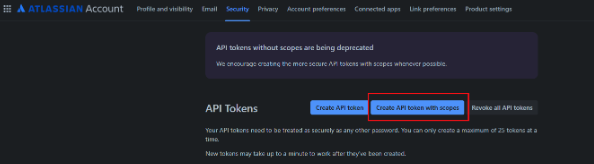
For the Jira Cloud integration, a personal user account or a service account needs to be used to generate the required API key. You can use either a Classic Token or a Scoped Token (recommended). For more info: Manage API tokens for your Atlassian account | Atlassian Support
3.1 Generating a Classic Token
This method is simpler but grants broader access (full user permissions for the generating account).
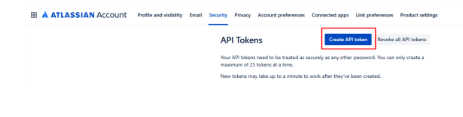
- Navigate directly to your API token management page
- Click Create API token and name it (e.g., "TuringOne Jira Integration").
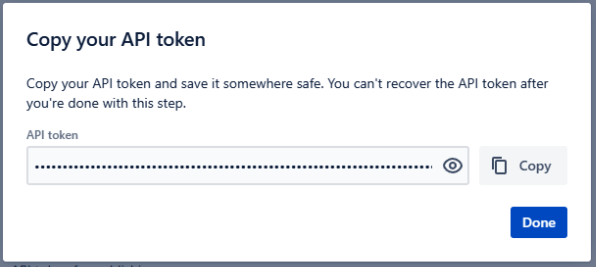
- Copy the generated token immediately.
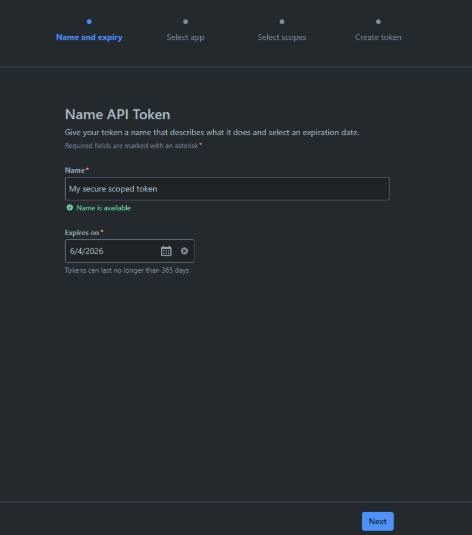
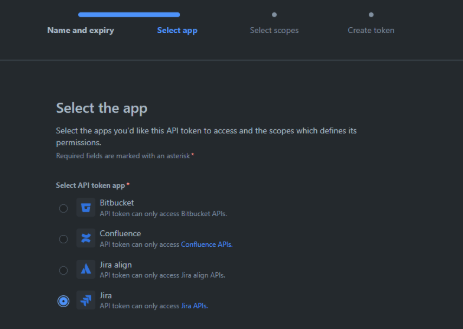
- Follow the steps in the Jira UI to create a new Scoped Token.
- You must ensure the token includes the following extensive list of read scopes to fully capture all issue details, attachments, project boards, and metadata needed for contextual generation:
- Cloud Instance URL (only change if you have a custom URL)
- Username (Email)
- API Key / Token
- (Optionally: Expiration Date)
- Contextual Analysis: TuringOne reads existing requirements and test case structures within Jira and Xray to inform generated output.
- Test Case Generation & Linkage: Allows TuringOne to generate new test cases and link them directly to Xray test types (e.g., Cucumber, Generic, Manual).
- Execution Management: Enables TuringOne to interact with Test Sets and Test Executions within Xray.
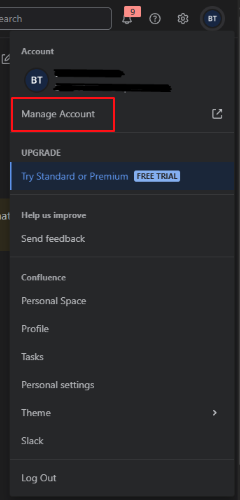
- Navigate to your Atlassian Account Settings. You can go straight to the token URL: Atlassian API Token URL
- Click Create API Token
- Provide a name (e.g., "TuringOne Xray Integration") and click Create.
- Copy the generated API Token immediately and store it securely
- In Jira, navigate to Jira Settings (Gear Icon) -> Apps (or access the Xray admin settings directly).
- Locate Xray in the Apps sidebar and click App settings
- In the Xray settings, navigate to the API Keys tab
- Click Create API Key
- Select the User or Service Account for which the key is being generated
- Click Generate
- Immediately copy and secure both the Client Id and the Client Secret
- Contextual Accuracy: TuringOne reads your requirements, guides, and technical specifications directly from SharePoint sites and folders to ensure generated test cases and scripts are aligned with the latest business logic.
- Knowledge Grounding: Prevents TuringOne from "hallucinating" or using generic information, ensuring all output is grounded in your organization's documentation.
-
Go to
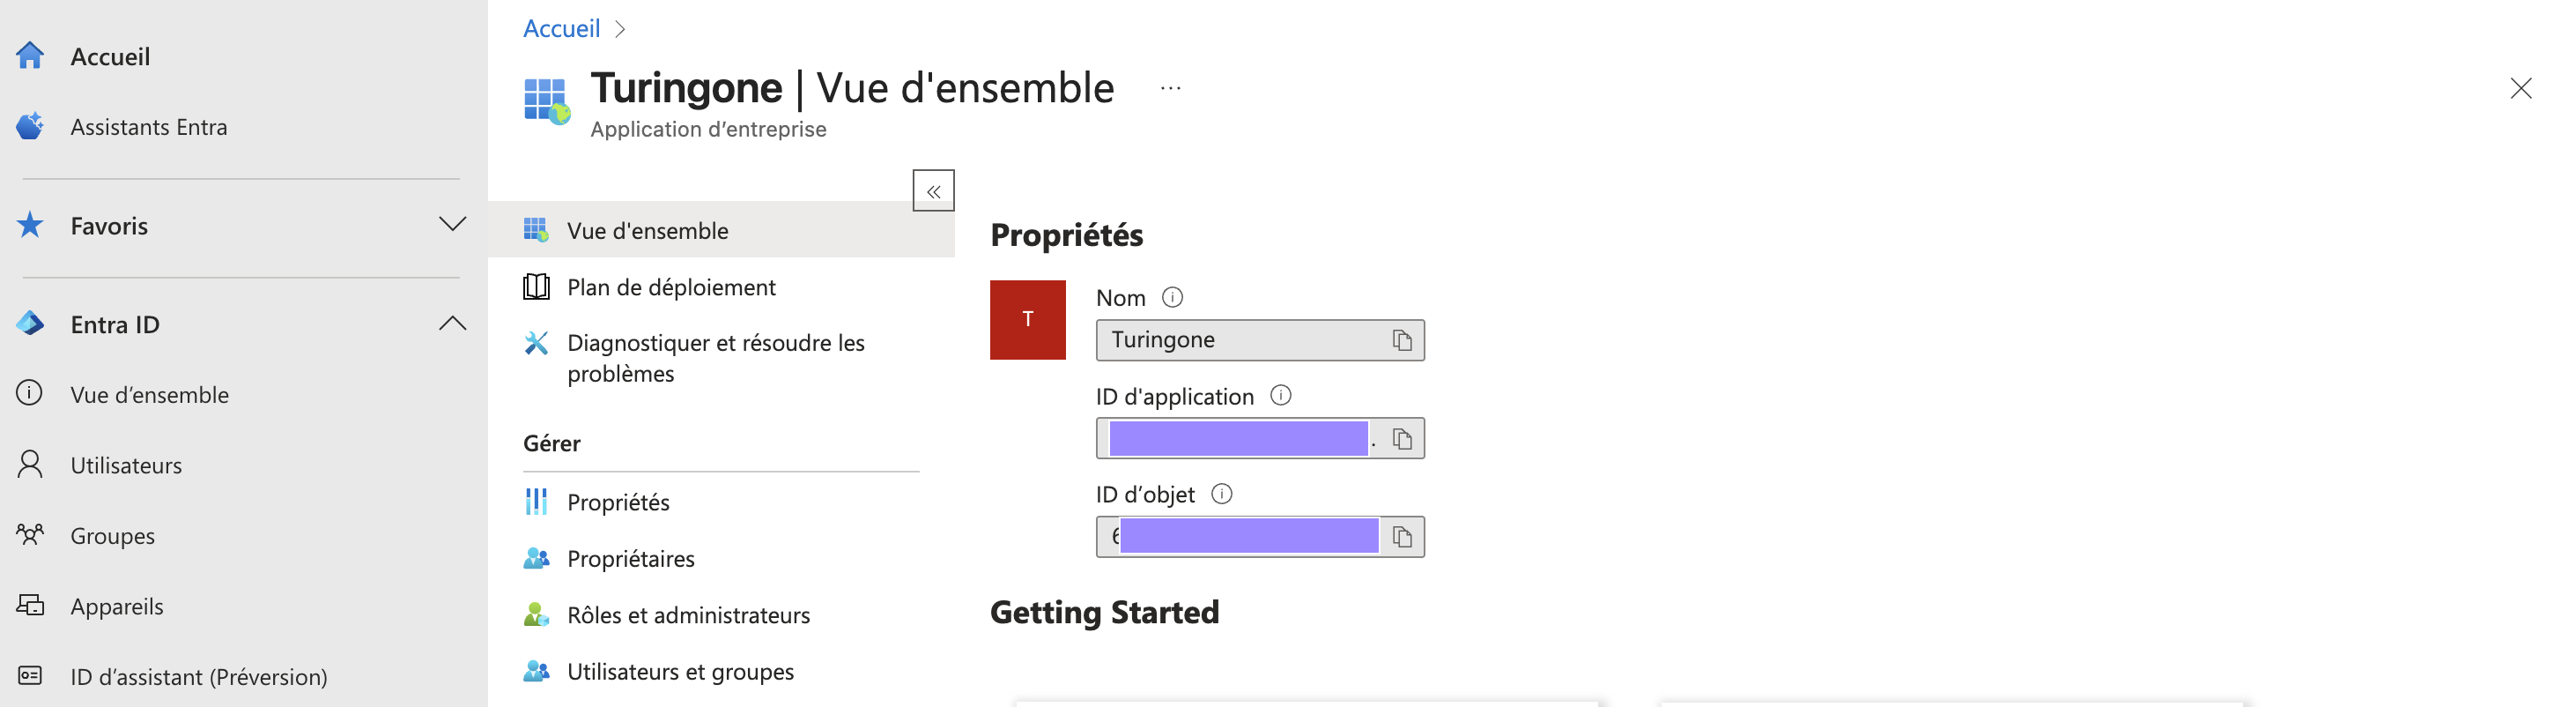
portal.azure.comand navigate to Microsoft Entra ID. - Select App registrations.
- Click New registration to create a new application for TuringOne.
- Once created, navigate to the Overview page to find your required IDs: Application (client) ID / Directory (tenant) ID
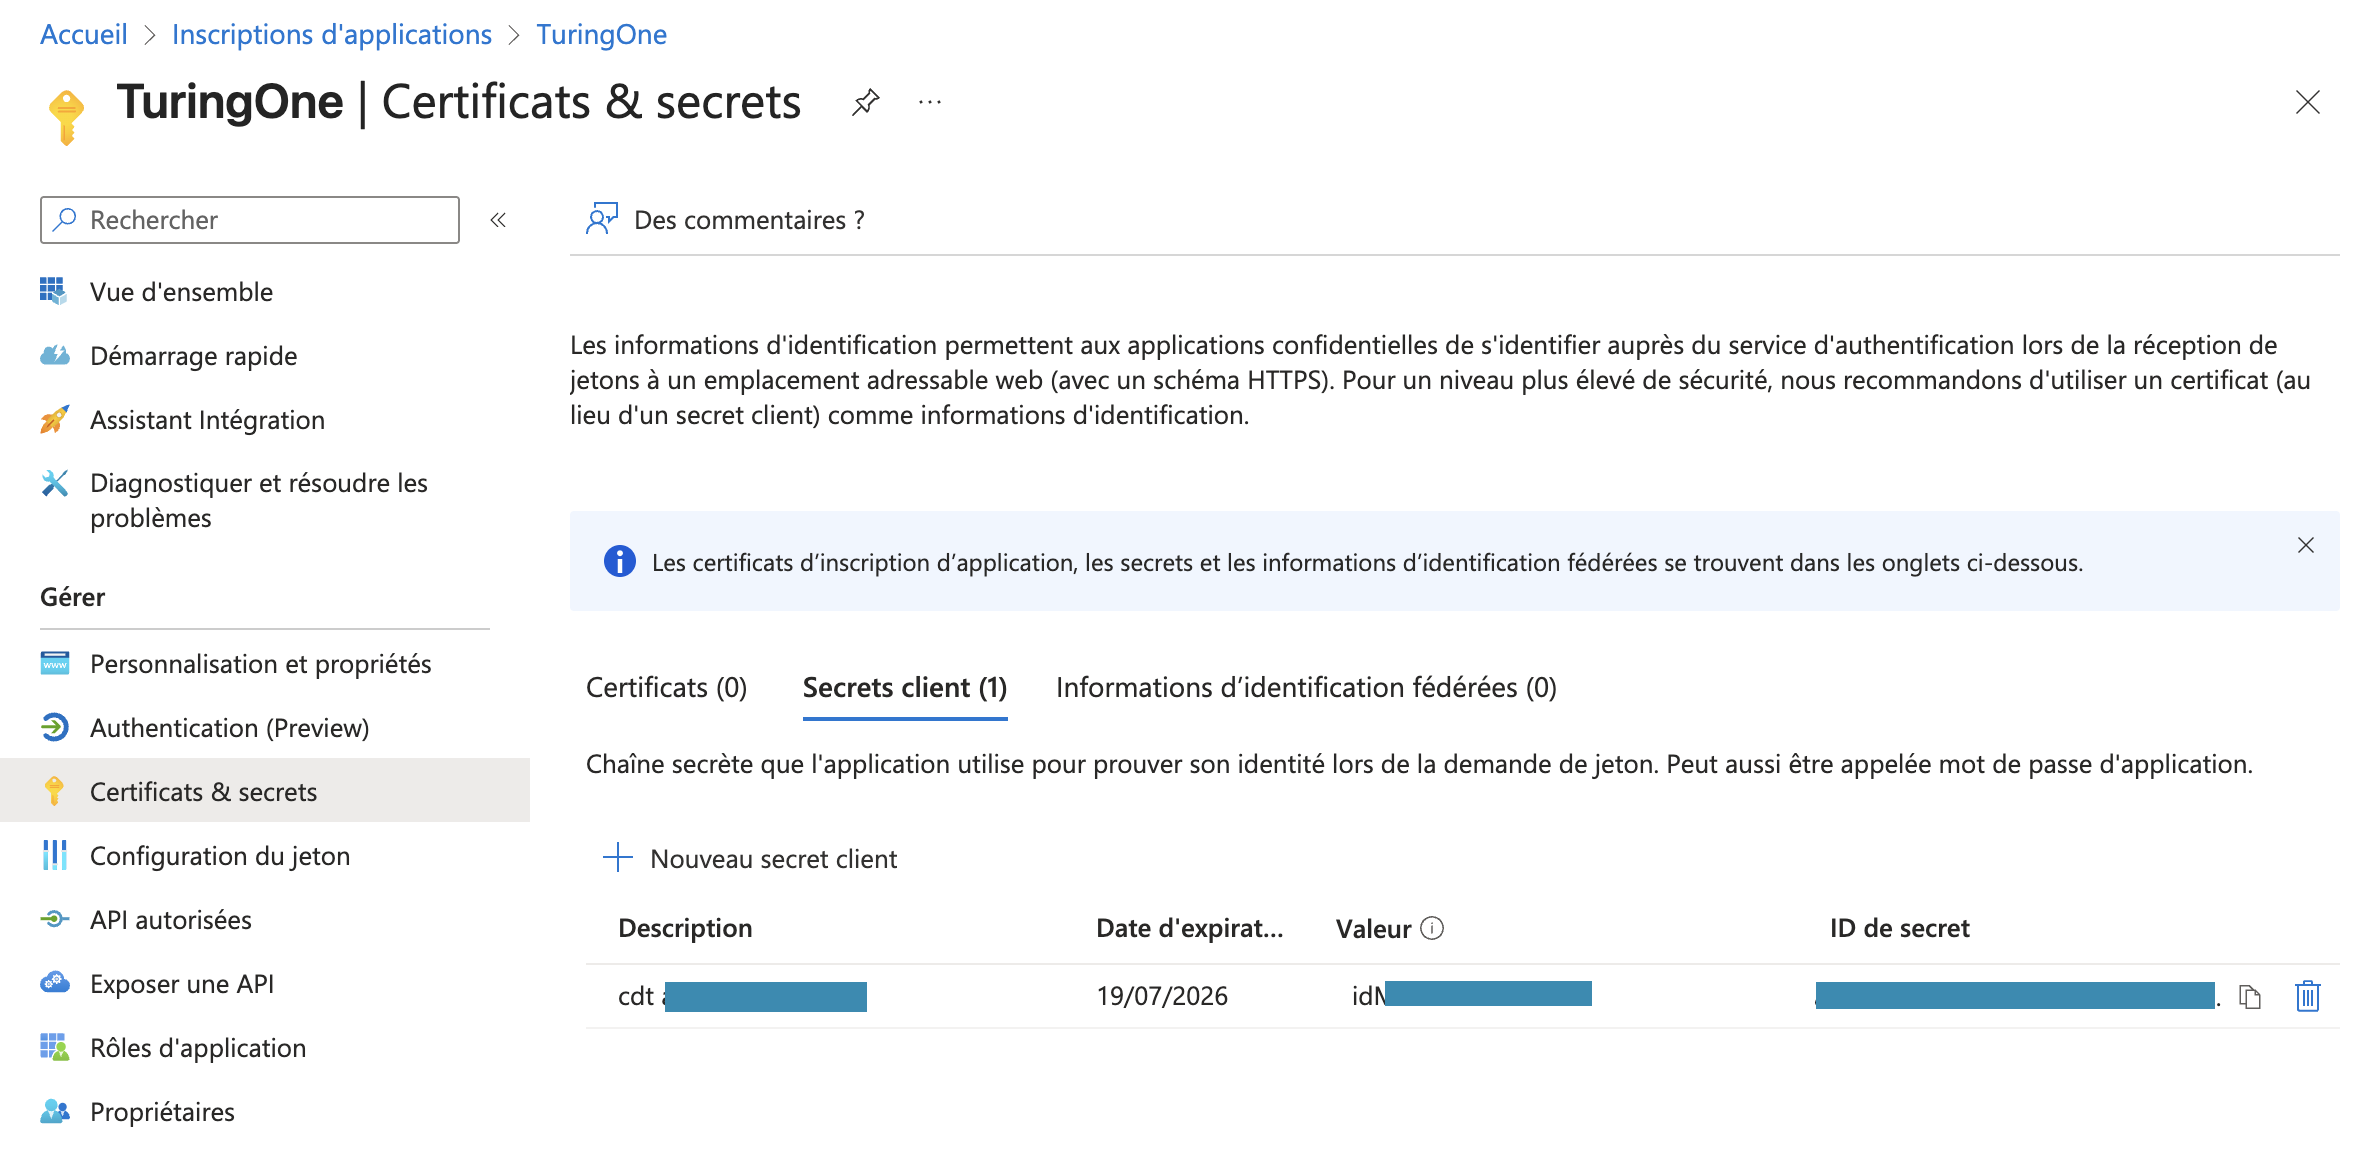
- Under the Manage menu for your new App Registration, select Certificates & secrets:
- Click New client secret.
- Copy the generated Value immediately. This is your Client Secret, and it will not be displayed again.
- Under the Manage menu, select API permissions.
- Click Add a permission and select Microsoft Graph.
- Select Application permissions.
- Set the permission to Sites.Read.All (Read all sites) or the more secure Sites.Selected with the appropriate sites granted access.
- Identify your SharePoint Site Name from your browser URL.
- To find your content name, navigate to your site's content via the UI:
- You must input the content name without spaces. Shared documents are automatically added.
- Tenant ID
-
Tenant Name
(e.g.,
tenant-name.sharepoint.com) - Client ID
- Client Secret
- SharePoint Site Name
- SharePoint Contents/Folder Name
- Access the project
- Open the Settings / Environments section
- Click on Add Environment
- Fill in the required information
- Environment name (e.g., DEV, UAT)
- Environment URL
- Variable:
client_email -
Entities:
professionalpersonal
- Reuse of variables across all tests
- Automatic adaptation based on the environment
- Improved readability of test scenarios
- Reduction of duplication and configuration errors
- Administrator
- Auditor
- Billing Manager
- Etc,
- API Keys
- Authentication tokens
- Technical credentials
- are stored in a secure manner
- are never displayed in plain text
- are dynamically injected during execution
- Word documents (DOCX)
- PDF documents
- Structured text files
- Images
- functional specifications
- business rules
- process descriptions
- application requirements
- associates a document with a project
- assigns it a clear and explicit title
- classifies it by category or theme
- better readability
- more relevant AI analysis
- enhanced traceability
- Access the Documentation module
- Click on Import a document
- Select the file
- Validate the import
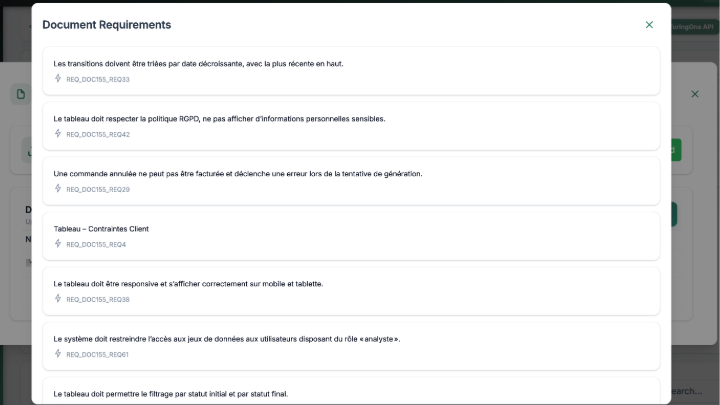
- View the requirement details for each document
- SharePoint site name
- All folders
- Subfolders
- Available files
- Metadata (name, size, date, version, hash)
- Documents present in SharePoint
- Documents already registered in TuringOne
- Delete the document and its associated requirements
- Keep existing requirements
- Only detected changes are processed
- Synchronization time is optimized
- No data duplication occurs
- Files remain stored in SharePoint
- TuringOne does not download documents
- Only metadata and version signatures are used
- Access is secured via the Microsoft Graph API
- Organize SharePoint folders by project or module
- Avoid massive folder renaming after synchronization
- Run a synchronization after each documentation update
- Requirement generation
- Intelligent search
- Test case generation
- Coverage analysis
- automatically import User Stories
- synchronize them with the project
- maintain consistency across tools
- Jira identifier
- title
- description
- status
- the content of documents
- the descriptions of User Stories
- business terminology
- identify key concepts
- understand functional intentions
- detect logical dependencies
- Documents ↔ APIs
- User Stories ↔ APIs
- Requirements ↔ Tests
- full traceability
- a clear view of functional coverage
- efficient impact management in case of changes
- Access the APIs module
- Click on Import Swagger / OpenAPI/ Collection Postman
-
Select:
- a Swagger file (JSON / YAML)
- or a Swagger URL
- or a Collection Postman
- Start the upload
- endpoints are automatically detected
- methods, parameters, and responses are analyzed
- the API structure is available in the interface
- new endpoints are detected
- modified endpoints are identified
- removed endpoints are flagged
- its path (
/v1/users,/orders/{id}, etc.) - its status
- its functional relationships
- navigate between endpoints
- identify critical APIs
- understand the covered scope
- HTTP methods (GET, POST, PUT, DELETE, etc.)
- their functional role
- expected responses
- technical readability
- targeted test generation
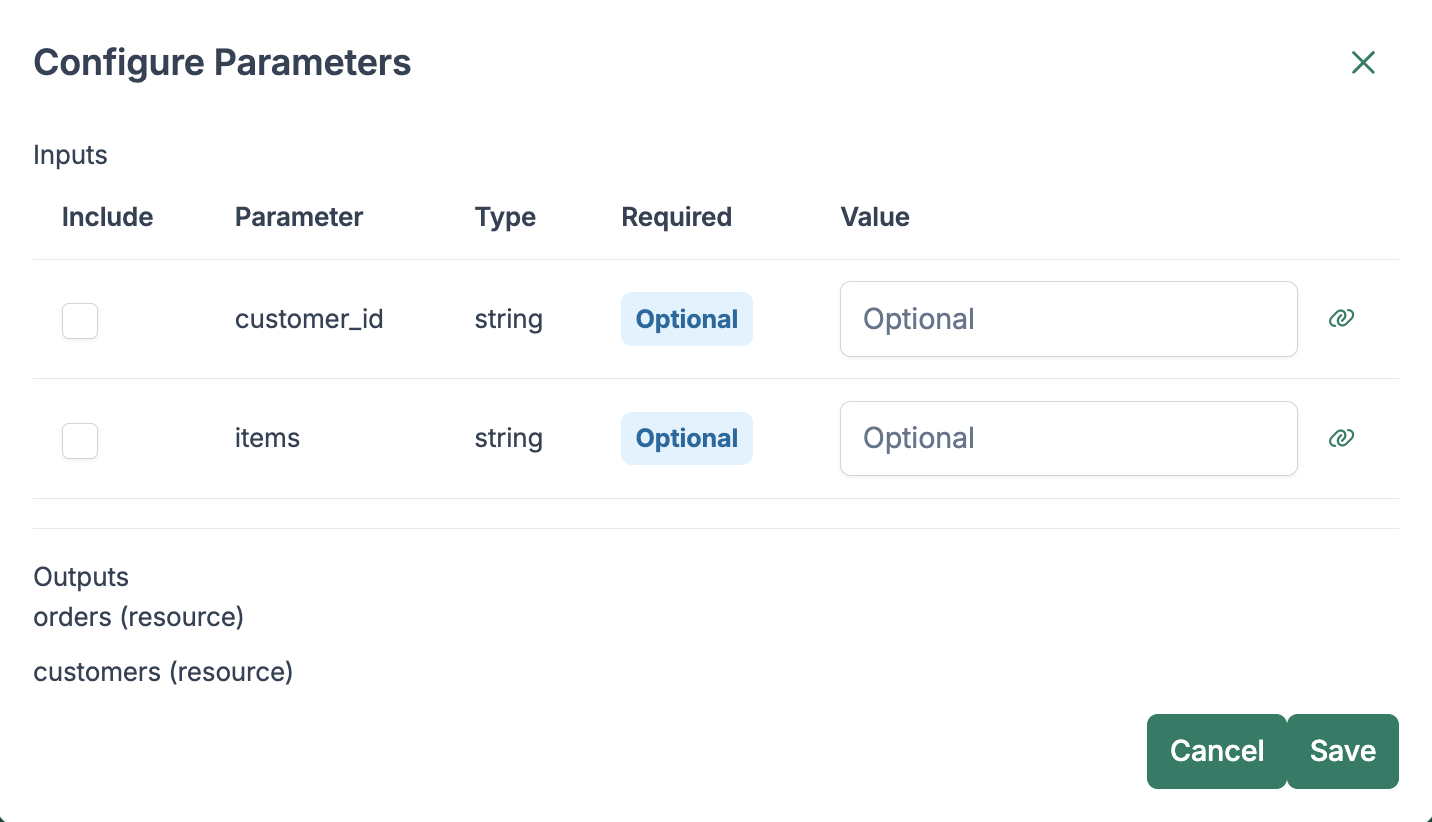
- path parameters
- query parameters
- request body
- headers
- type
- required or optional indicator
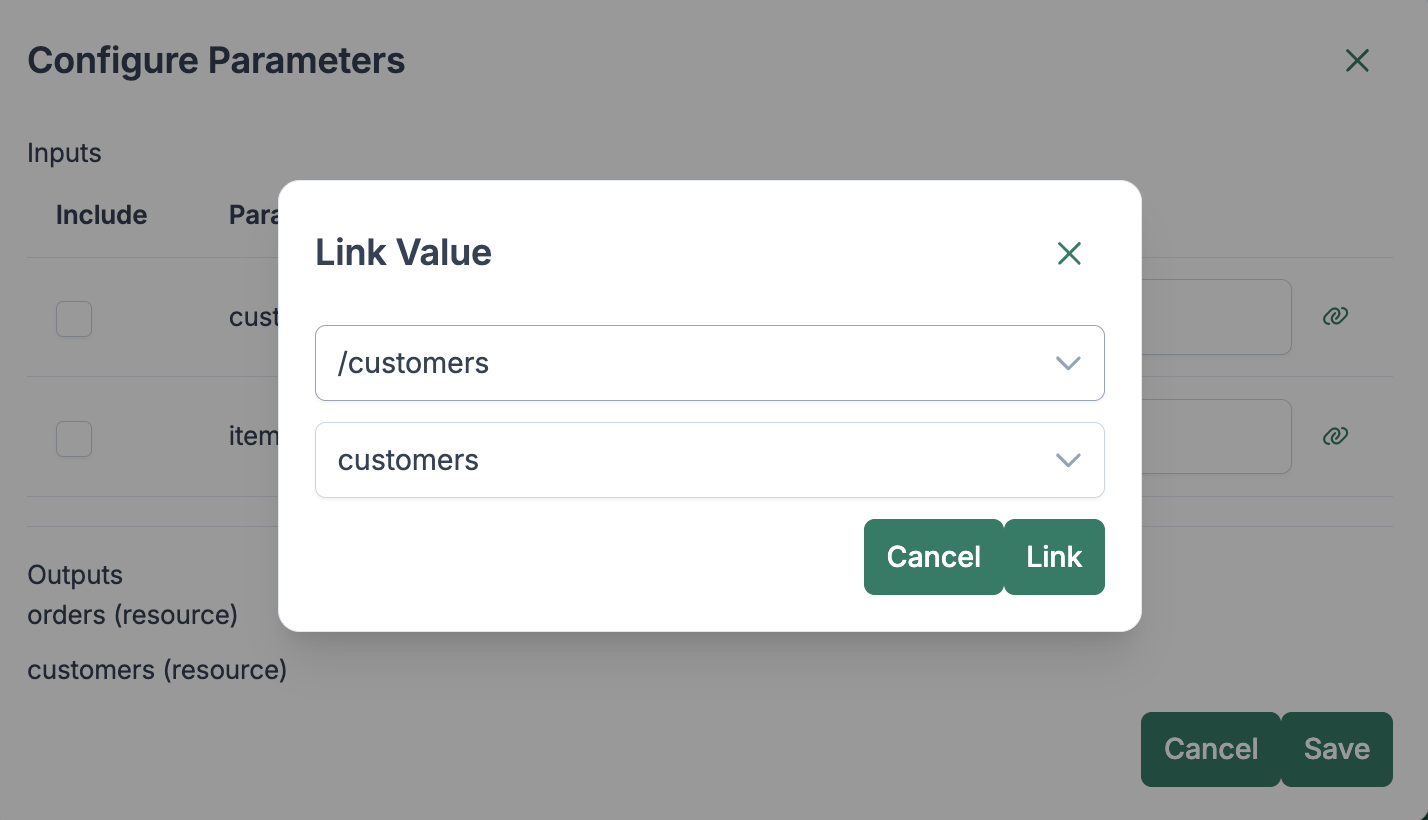
- possible constraints
- User Stories are associated with relevant endpoints
- functional intentions are linked to technical operations
- verify functional coverage
- identify APIs that are not covered by requirements
- to generate tests aligned with business requirements
- functional documents
- to the relevant APIs
- full traceability
- quick understanding of impacts
- simplified change management
- Access the APIs module
- Select an endpoint
- Choose the relevant HTTP method
- Click Generate tests
- a specific endpoint
- a specific method (GET, POST, etc.)
-
Positive tests
- Valid data
- Expected behavior
- Compliant responses
-
Negative tests
- Missing fields
- Invalid types
- Out-of-range values
- Functional error cases
- the API structure
- parameter constraints
- the functional context derived from User Stories
-
Positive tests
- Valid data
- Expected behavior
- Compliant responses
-
Negative tests
- Missing fields
- Invalid types
- Out-of-range values
- Functional error cases
- the API structure
- parameter constraints
- the functional context derived from User Stories
- a valid payload
- an expected status code (e.g., 200, 201)
- response validation
- missing required parameter
- invalid value
- unauthorized access
- detect functional failures
- strengthen overall API quality
- realistic data
- compliance with technical constraints
- case diversity
- review generated data
- modify it if necessary
- reuse it across multiple tests
- Jira URL
- Jira Project
- API credentials / Token
- Test type mapping
- Jira URL
- Jira Project
- API Credentials / Token
- Test type mapping
- Creates Xray Test Issues in Jira
- Associates test steps
- Defines priorities and test types
- Adds full descriptions and applies a "TuringOne" tag in Xray
- Each TuringOne test case contains an Xray link
- Each Xray Test Issue contains a TuringOne reference
- Full traceability
- Progress tracking in Jira
- Status synchronization
- Updated in SharePoint
- Or modified via classic import
- Identifies impacted requirements
- Regenerates related test cases
- Proposes test updates in Xray
- Secure connection via Jira API Token
- No sensitive data stored on TuringOne without consent
- Complete synchronization history
- Validate AI-generated tests before exporting to Xray
- Organize Xray tests by folder or component
- Run synchronization after each documentation update
- Automated
- Traceable
- Consistent
- Easy to maintain
- Development (DEV)
- Test (TEST)
- User Acceptance Testing (UAT)
- Preproduction (PREPROD)
- API URLs
- Access parameters
- Test data
- Static variables
- Service URL
- Country code
- Account type
- Branch identifier
- Defined per environment (DEV, TEST, UAT, etc.)
- Can be overridden at the test case level
- Persistent across executions
- Random email address
- Customer number
- Random future date
- Unique identifier
- Automatically generated at each test execution
- Prevent data conflicts
- Ensure execution independence
- Customer name
- Project reference
- Defined in project settings
- Accessible by all tests
- Centralized for global consistency
- Load Global variables
- Load Static variables based on the selected environment
- Generate Random variables
- Execute tests
- Variables available throughout all workflow steps
- Use default variables
- Override a Static variable for a specific need
- Sensitive variables (tokens, passwords) are encrypted
- No confidential data is stored in plain text
- Random values are never reused
- Same tests across multiple environments
- Dynamic data without conflicts
- Centralized configuration
- Reproducible executions
- Simplified maintenance
- Select the target environment
- Start execution
- Status of each test (success / failure)
- Response time
- Potential errors
- Detailed logs
- Quick identification of anomalies
- Monitoring quality over time
- Go to the E2E Flows module
- Click on "Create API E2E Test"
- Provide a name and a detailed description for your scenario
- Click the Validate button
- an endpoint
- an HTTP method
- a dataset
- expected validations
- reorder steps
- define logical dependencies
- verify the overall workflow consistency
- creation → retrieval → update → deletion
- authentication → business action → verification
- generated identifier (
id) - authentication token
- business reference
- the response body
- the headers
- the metadata
- request parameters
- payloads
- headers
- dynamic scenarios
- high reusability
- data consistency throughout the workflow
- which variables are created
- where they are used
- sent requests
- received responses
- calculated variables
- potential errors
- analyze failures
- debug issues
- understand API behavior
- the overall scenario status
- the result of each step
- response times
- successful or failed validations
- precisely identify the failing step
- validate the complete business logic
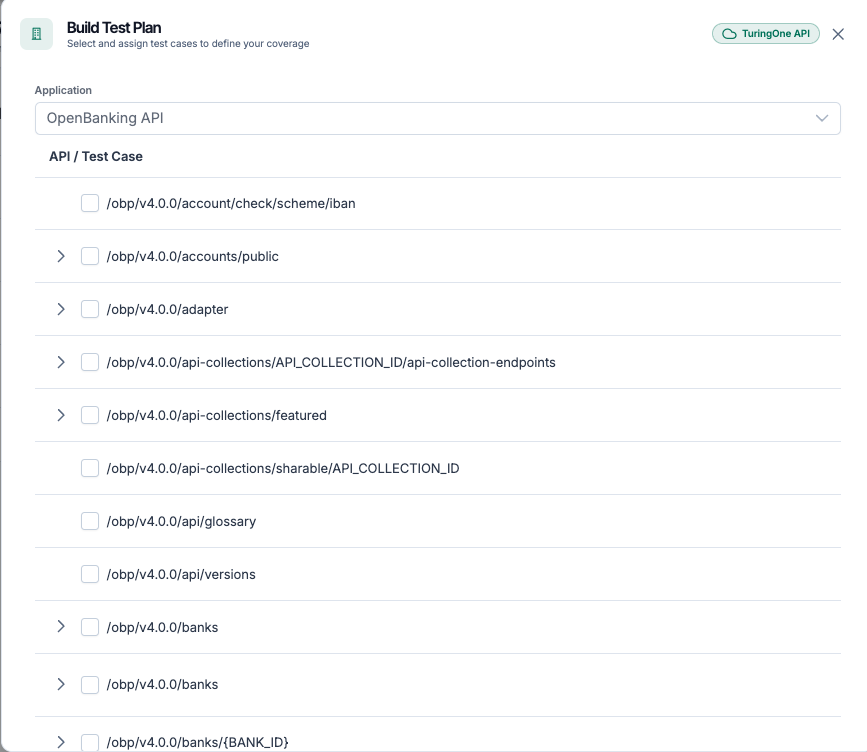
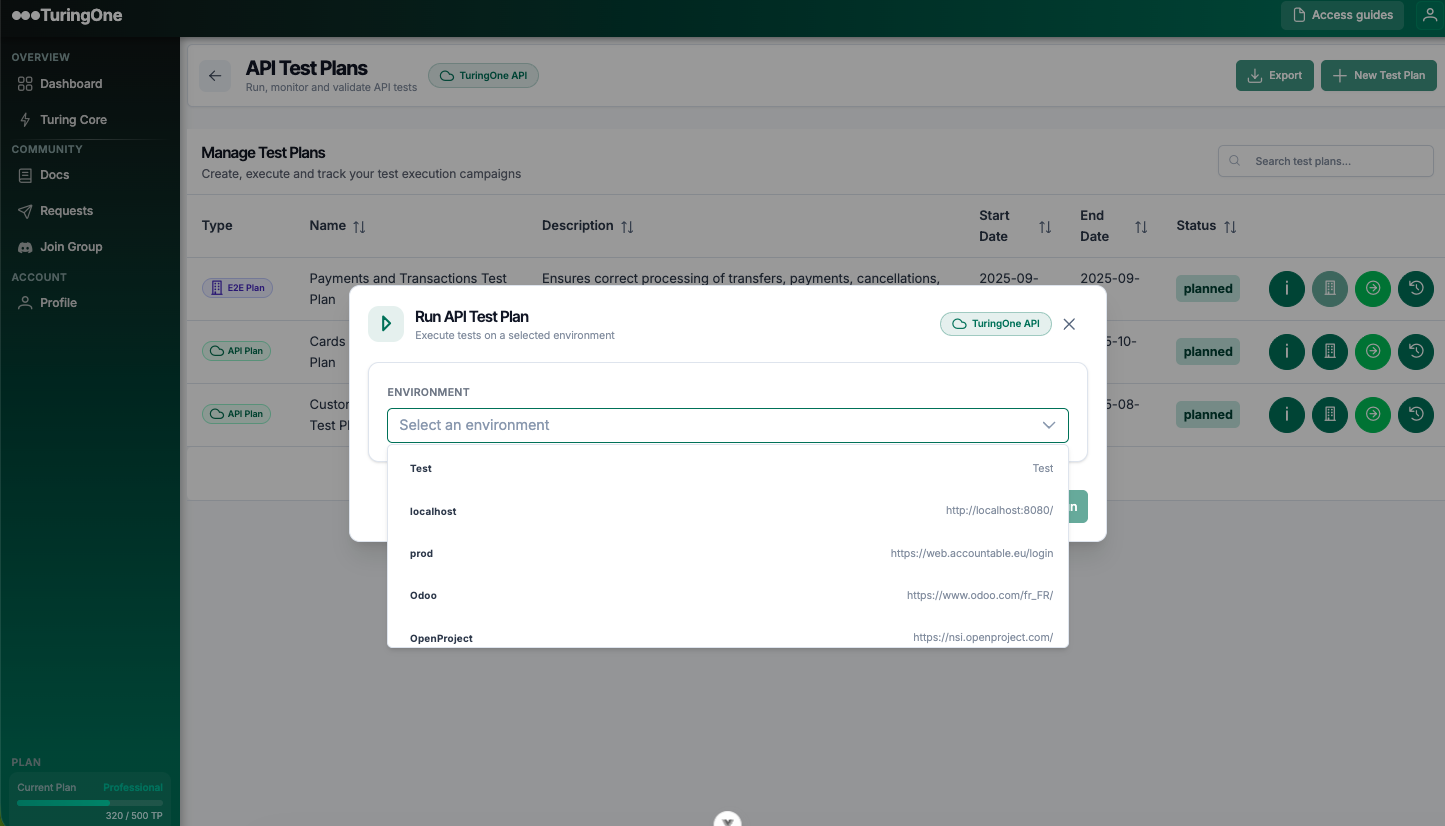
- Navigate to test plans
- Create a test plans
- Select a scenarios
- Choose the environment to execute the tests plan
- Start execution
- steps in real time
- actions performed on the screen
- any visual errors
- understanding the test flow
- functional validation
- failure analysis
- scenario status (success / failure)
- screenshots
- encountered errors
- execution time
- quick analysis
- clear communication with teams
- continuous improvement of UI tests
- Authentication
- Account management
- Order creation
- Payment
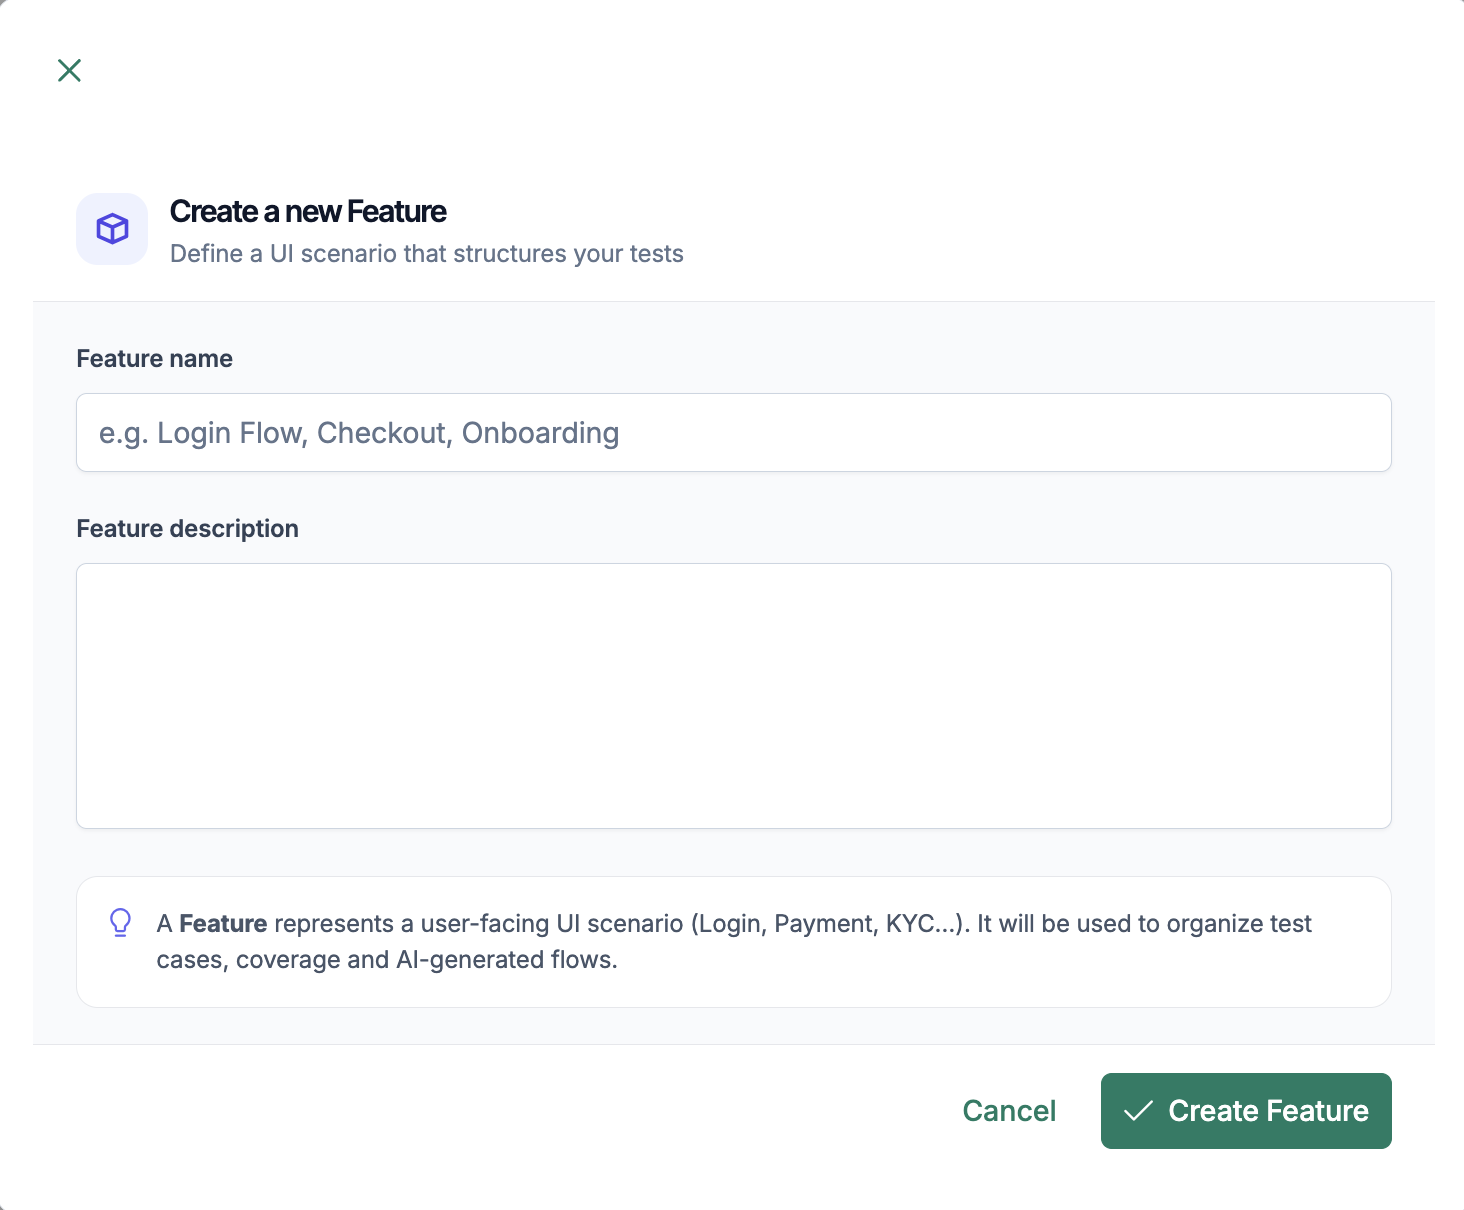
- Go to the UI Tests module
- Click on Create a feature
-
Provide:
- the feature name
- a functional description
- Validate
- better visibility
- alignment with User Stories
- easier maintenance
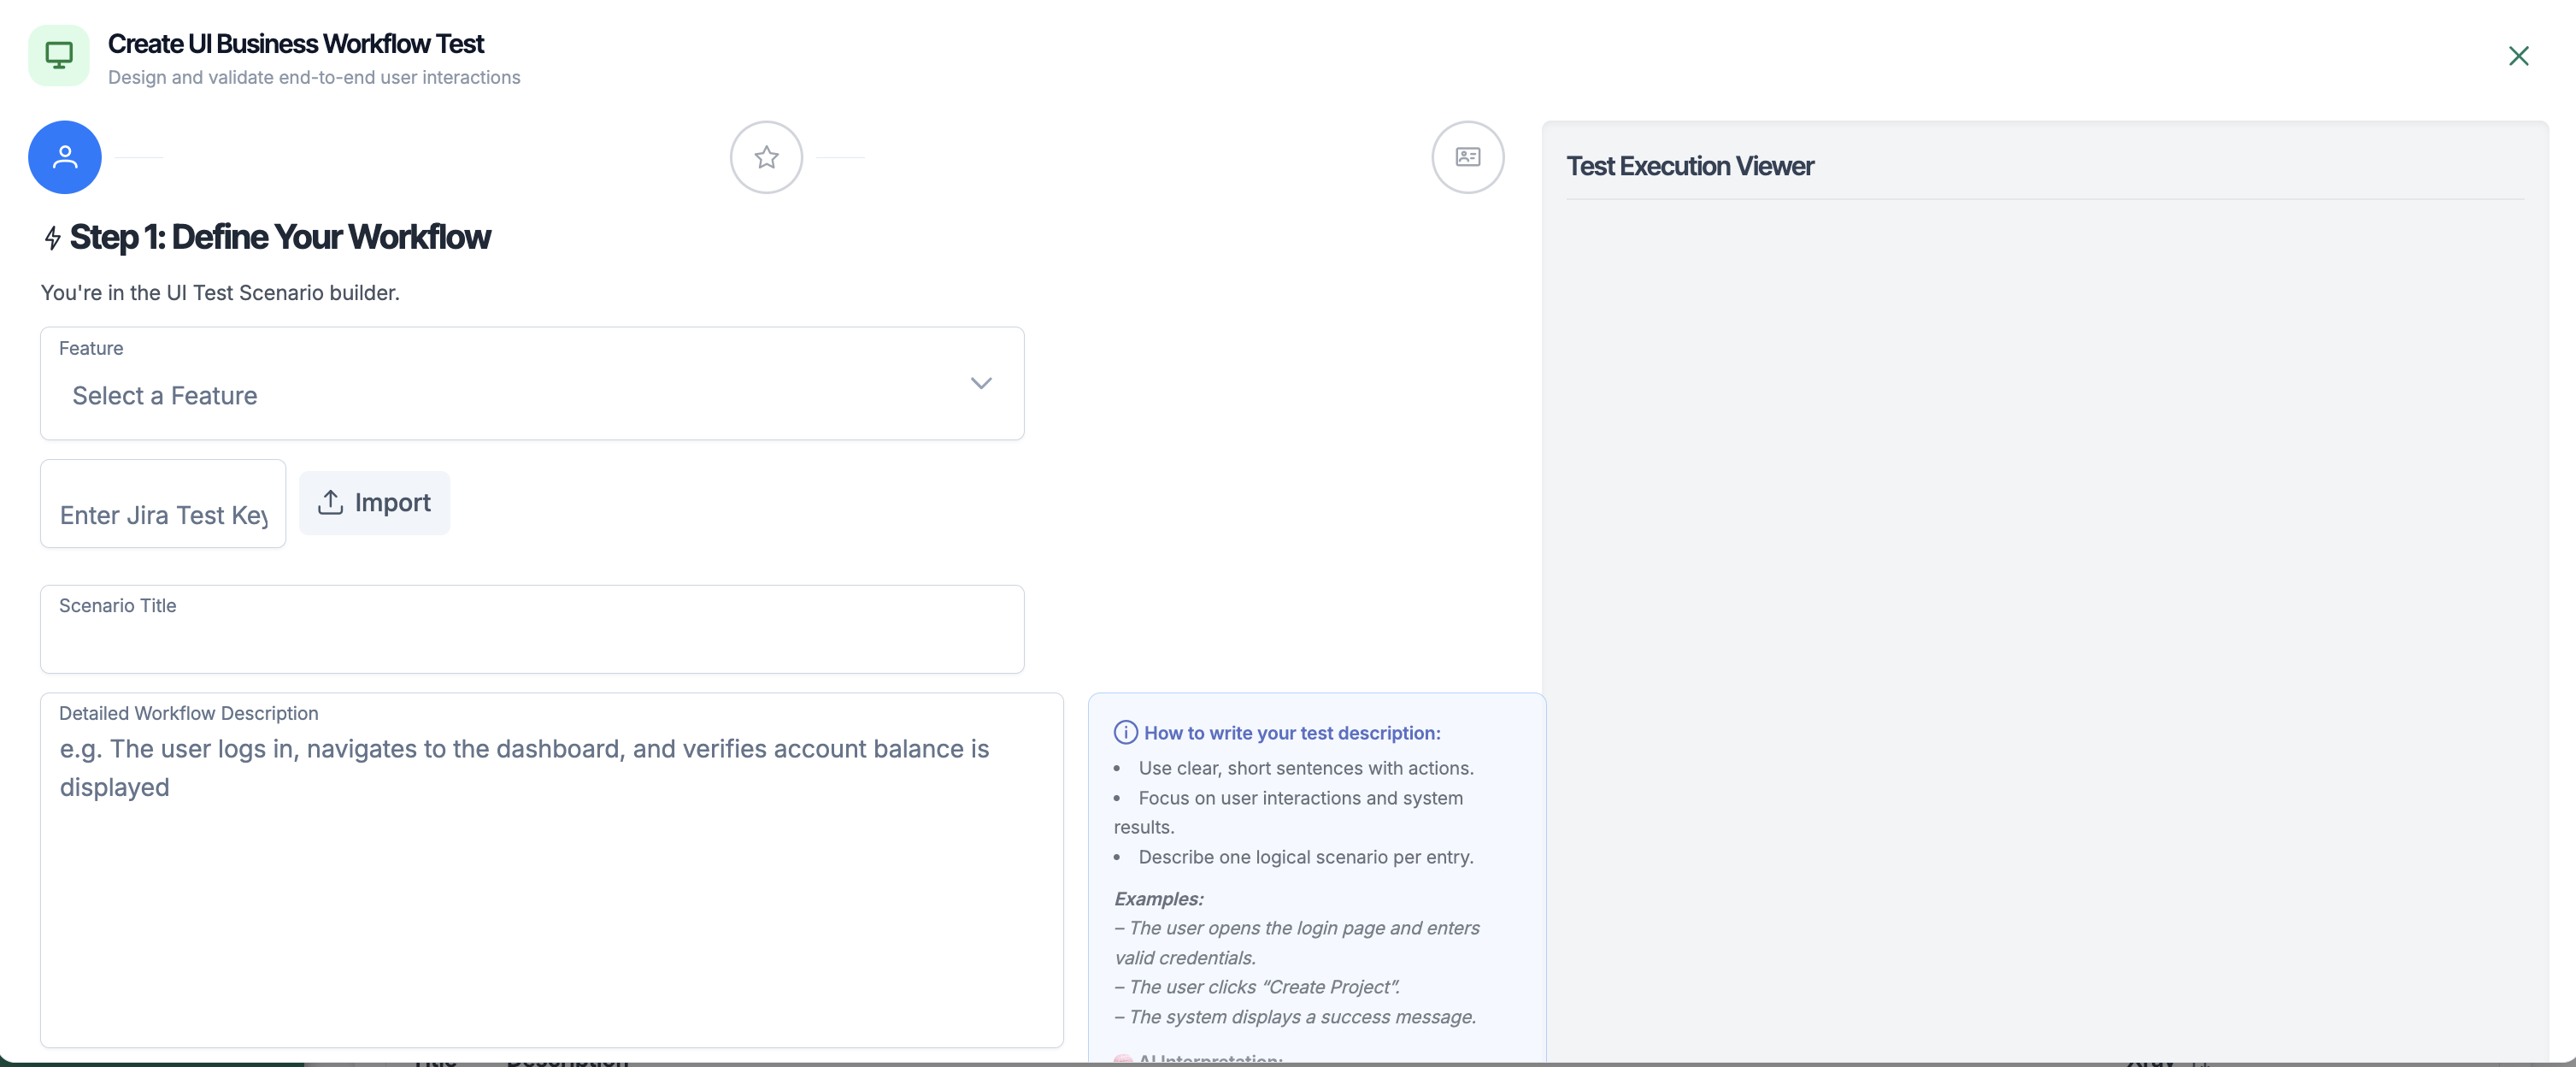
- Open the login page
- Enter a username
- Click the validation button
- Verify that a message is displayed
- Readable
- Close to business language
- Independent from technical implementation
- Clicks
- Text input
- Element selection
- Navigation between pages
- Visual validations
- The page structure
- Visible labels
- The functional context
- Given (preconditions)
- When (user or system actions)
- Then (expected results)
- Alignment of tests with business language
- Elimination of ambiguities
- Guaranteeing a consistent and standardized structure
- the scenario is correct
- the behavior matches the expected outcome
- the BDD accurately reflects the functional requirement
- follow the steps one by one
- see the actions being performed
- observe the validations
- immediately detect potential errors
- fast scenario validation
- a clear understanding of the execution flow
- immediate feedback before final persistence
- confirm that the BDD scenario is compliant
- permanently save the test case
- make the test reusable in future campaigns
- the test case is saved
- it becomes a stable reference
- it can be executed automatically (CI/CD, scheduled campaigns, etc.)
- The user enters a functional description
- Clicks Validate → automatic BDD scenario generation
- Clicks Run → real-time execution
- Analyzes the result
- Clicks Validate → final test case persistence
- Authentication and authorization tests
- Input validation tests
- Sensitive data exposure tests
- API misconfiguration tests
- the API structure
- HTTP methods
- the functional context
- the affected API
- the vulnerability type
- the detection scenario
- the associated technical details
- clear
- contextualized
- action-oriented
- Low
- Medium
- High
- Critical
- quick prioritization
- better risk management
- clear communication with technical and business teams
- a clear and understandable explanation
- the functional and technical context
- the probable root causes
- a better understanding of risks
- upskilling of technical teams
- a reduction of recurring errors
- adjusting access controls
- strengthening input validation
- modifying API configuration
- applying security best practices
- actionable
- prioritized
- adapted to the project context
- API tests
- End-to-End scenarios
- UI tests
- Security tests
- the total number of executed tests
- passed / failed tests
- encountered errors
- trends over time
- by campaign
- by project
- by module (API, UI, Security)
- API tests
- End-to-End scenarios
- UI tests
- Security tests
- the total number of executed tests
- passed / failed tests
- detected errors
- trends over time
- by campaign
- by project
- by module (API, UI, Security)
- test success rate
- regression frequency
- functional compliance
- result repeatability
- API reliability
- robustness of End-to-End scenarios
- unstable behavior
- intermittent issues
- production risks
- the number of detected vulnerabilities
- their severity level
- their evolution over time
- decide whether a version is ready for release
- identify blocking risks
- arbitrate between fixing issues and going to production
- intuition-based decisions
- approximations
- interpretation conflicts
- prioritize fixes
- focus on critical functionalities
- optimize testing effort
- The AI re-analyzes the content
- Differences are taken into account
- Existing links are adjusted if necessary
- Access the Documentation module
- Select the relevant document
- Import a new version
- Validate the update
- Go to the Applications module
- Select the existing definition API source
- Import a new version or provide a new URL
- Start the synchronization
- newly added endpoints
- modified endpoints
- removed endpoints
- links between Documents ↔ User Stories ↔ APIs are recalculated
- impacted tests are identified
- affected scenarios are flagged
- propose updates to existing tests
- suggest new tests
- mark certain tests as obsolete
- avoid false positives
- maintain relevant test coverage
- reduce manual maintenance effort
- document versions
- API definitions (Swagger/Collections) versions
- User Stories evolutions
- test generation and updates
- execution results
- simplified audits
- a clear understanding of the project’s past
- justification of decisions made
- regulatory environments
- banking systems
- critical or sensitive systems
- Create one project per application or functional domain
- Avoid overly broad projects
- Clearly name features and scenarios
- Import documents and User Stories first
- Let the AI build the business understanding
- Do not generate tests too early
- Rerun synchronization after each change
- Use TuringOne as a living reference system
- Start by stabilizing API tests
- Build UI scenarios on a solid functional foundation
- Use workflows for critical user journeys
- Share and reuse data across steps
- Run security tests regularly
- Do not wait until pre-production
- trends
- regressions
- AI recommendations
- Let the AI propose
- Adjust, enrich, and validate
- Build long-term value over time
3.2 Generating a Scoped Token (Recommended)
This method uses the newer Scoped Token framework to ensure the token only has the specific, minimal read permissions TuringOne needs to gather context.
| Required Read Scopes (Example List) | Required Read Scopes (Example List) | Required Read Scopes (Example List) |
|---|---|---|
read:attachment:jira |
read:issue-adjustments:jira |
read:remote-link-info:jira |
read:avatar:jira |
read:issue-details:jira |
read:remote-link:jira-software |
read:board-scope:jira-software |
read:issue-event:jira |
read:status:jira |
read:board-scope.admin:jira-software |
read:issue-field-values:jira |
read:sprint:jira-software |
read:comment:jira |
read:issue-link-type:jira |
read:task:jira-service-management |
read:field:jira |
read:issue-link:jira |
validate:jql:jira |
read:filter:jira |
read:issue:jira |
read:jql:jira |
read:filter.column:jira |
read:issue.changelog:jira |
read:label:jira |
| …and many others | (A large number of specific read scopes are needed to ensure full context) | |
Reference: For more info on managing API tokens and scopes, see: Manage API tokens for your Atlassian account | Atlassian Support
3. Entering Details in TuringOne
Once you have secured your API Key/Token, you can complete the setup in the TuringOne platform.
Step 1: Navigate to your project
Go to your TuringOne settings and select the Integrations page.
Step 2: Enter Details
Insert the gathered information into the corresponding fields:
| Configuration Field Name | Value to Enter | Notes |
|---|---|---|
| API key | The Jira API Token generated in this section. | Used for general Jira user authentication. |
| Expiration Date | Optional. Set the date your Jira API key expires. | Used by TuringOne for reminder alerts. |
| Jira Base URL |
The Jira Instance URL (e.g., yourcompany.atlassian.net).
|
Excludes the /jira/software/... path. |
| Project Key |
The Project Key (e.g., PROJ) where Xray test cases are managed.
|
The key used in Jira for the target project. |
Step 3: Save and Confirm
Click "Save Configuration." If the set-up is successful, you
will receive a success message and see a green indicator next to your Jira
integration.
4. Troubleshooting Jira Integration
If TuringOne reports an error or fails to connect, use this checklist to quickly identify and resolve the most common issues related to access and context retrieval.
| Problem | Cause | Solution |
|---|---|---|
|
Connection Failed: "Unauthorized" or "Access Denied" |
A. Missing Scopes: The API Key (especially Scoped Token) is missing one or more of the necessary read scopes listed in this section. | Verify Scopes: Check the API Key permissions against the extensive list of required read scopes. The token must have read access to all necessary work item details. |
|
Cannot Find Issues/Boards |
B. Incorrect Cloud ID/URL: The Cloud Instance URL or Cloud ID is incorrect. |
Double-Check URL:
Verify the URL and re-run the tenant_info cURL command if
using a Scoped Token.
|
|
TuringOne Connects, But Context is Poor |
C. Token User Permissions: The user generating the token does not have permission to view certain projects or boards you are asking TuringOne to analyze. | Check User Access: Ensure the user account associated with the token has view access to the specific Jira projects being referenced in your prompts. |
| Token Expired | D. Token Expiration: Access Tokens are set to expire after a certain period. | Generate New Token: The original user must create a new API key/token with the required scopes and update the configuration in TuringOne. |
4.1 Connexion à Xray Test Management (Cloud)
This guide provides the necessary details to quickly and securely connect your Xray Test Management instance within Jira Cloud to TuringOne, enabling deep integration with your testing artifacts.
Updated over a week ago
⚠️ Warning: This integration is for Xray Test Management and Xray Enterprise within Jira Cloud. It is not for the separate Xray Exploratory Testing application.
1. How does TuringOne Leverage This Integration?
Connecting to Xray allows TuringOne to integrate directly into your Jira/Xray testing management workflow:
1. How does TuringOne Leverage This Integration?
Connecting to Xray allows TuringOne to integrate directly into your Jira/Xray testing management workflow:
1.1 Complementary Value: TuringOne and Xray AI
Xray Test Management offers powerful AI capabilities focused on internal test model generation, coverage maximization, and execution pipeline triggering within the Jira ecosystem. TuringOne is highly complementary, specializing in multisource context aggregation and open ecosystem delivery.
| Focus Area | Xray Contribution | TuringOne Contribution |
|---|---|---|
| Context & Generation | Internal Modeling: Uses AI Test Model Generation and Intelligent Augmentation algorithms to transform Jira requirements into visual models and find coverage gaps. | External Synthesis: Consumes the organized Jira/Xray context and synthesizes it with documentation from Confluence, SharePoint, Redmine, Notion, Azure Wiki, etc., to generate assets based on all available enterprise knowledge. |
| Execution & Delivery | Test Management: Manages test case versions, compliance, dynamic test plans (JQL), and triggers CI/CD pipelines for execution. | Open Ecosystem: Delivers automation code (Playwright, Selenium) into external code repositories (GitHub, GitLab, Bitbucket), streamlining the customer's self-managed automation pipeline for execution by external tools (e.g., BrowserStack). |
By leveraging both platforms, customers gain the benefit of Xray's governance and execution control alongside TuringOne's superior, context-driven generation and broad connectivity.
2. Information Required from Your Xray Account
Xray authentication is a two-step process requiring both a Jira-level token for standard user access and an Xray-specific Client ID/Secret for programmatic access.
Required Detail
| Required Detail | Explanation | How to Find It |
|---|---|---|
| Jira URL | The full URL of your Jira Cloud instance with the project key. |
https://<MY_DOMAIN>.atlassian.net/jira/software/c/projects/<PROJECT_KEY>
|
| Username | The email address of the user or service account for the API token. | Your Jira login email. |
| API Token | A secure token generated in your Atlassian settings for user authentication. | See this Section |
| Client ID | A unique identifier for the Xray API application. | See this Section |
| Client Secret | The confidential key corresponding to the Client ID. | See this Section |
3. Setting up the Integration (Two-Part Authentication)
You must generate two distinct sets of credentials: the Atlassian API Token and the Xray Client ID/Secret.
3.1 Part A: Generate Jira API Token
This token authenticates the user account (or service account) within Jira.
3.2 Part B: Generate Xray Client ID and Secret
This creates the specific credentials required by the Xray API endpoints.
4. Entering Details in TuringOne
Once you have secured all five required credentials, you can complete the setup in the TuringOne platform.
Step 1: Navigate to your project
Go to your TuringOne settings and select the
Integrations page.
Step 2: Enter Details
Insert the following details into the corresponding fields:
| Configuration Field Name | Value to Enter | Notes |
|---|---|---|
| Client ID | The Client ID from the Xray API Key generation. | Identifies the Xray application. |
| Client Secret | The Client Secret from the Xray API Key generation. | The confidential key for the Xray API. |
| Xray Base URL | The Jira Instance URL (e.g., yourcompany.atlassian.net). | Excludes the /jira/software/... path. |
Step 3: Save and Confirm
Click "Save Configuration." If the set-up is successful, you will
receive a success message and see a green indicator next to your integration.
5. Troubleshooting Xray Integration
If TuringOne reports an error or fails to connect, use this checklist to quickly identify and resolve the most common issues related to the two-part authentication.
| Problem | Cause | Solution |
|---|---|---|
|
Connection Failed: "Jira Unauthorized" |
A. Invalid Jira API Token: The Atlassian API Token or Username (email) is incorrect. | Verify Jira Credentials: Check the Atlassian Account settings to ensure the API Token and associated Username are correct. |
|
Connection Fails: "Xray API Error" |
B. Invalid Xray Credentials: The Client ID or Client Secret generated in Xray is incorrect. | Verify Xray Credentials: Check the Xray API Keys settings to ensure the Client ID and Secret were copied accurately. |
|
Invalid Resource: Cannot Find Project |
C. Incorrect Project Key/URL: The URL or Project Key entered contains a typo. | Double-Check URL: Verify the full Jira URL, including the correct Project Key, as Xray access is project-scoped. |
| Token Expired | D. Token Expiration: The Jira API Token is set to expire. | Generate New Token: Create a new Jira API Token and update the configuration in TuringOne. |
Connexion à Azure DevOps Sharepoint Online (Cloud)
This guide provides the necessary details to quickly and securely connect your SharePoint Online documentation to TuringOne, enabling powerful context-aware analysis and test generation.
Updated over 2 weeks ago
How does TuringOne Leverage This Integration?
Connecting to SharePoint allows TuringOne to integrate your organization's documentation into the QA workflow:
2. Information Required from Your SharePoint Account
Connecting to SharePoint requires an App Registration within Microsoft Entra ID (formerly Azure Active Directory) to generate the necessary security credentials.
| Required Detail | Explanation | How to Find It |
|---|---|---|
| Tenant Name | The primary domain name for your SharePoint instance. | tenant-name.sharepoint.com |
| Tenant ID (Directory ID) | A unique identifier for your Azure/Microsoft Entra organization. | See this Section. |
| Client ID (Application ID) | The unique ID of the App Registration created for TuringOne. | See this Section. |
| Client Secret | The confidential key generated for the App Registration. | See this Section. |
| SharePoint Site Name | The specific site within your tenant you want TuringOne to read. | Found in your SharePoint URL. |
| SharePoint Contents/Folder Name |
The specific document library name (e.g., SiteAssets).
|
Found under Site Contents (See this Section). |
Setting up the App Registration (Microsoft Entra ID)
The most crucial step is setting up an App Registration to obtain the security credentials and grant read permissions.
3.1 Create App Registration & Retrieve IDs
3.2 Generate Client Secret
3.3 Set API Permissions
The App Registration must be granted permission to read your SharePoint sites.
3.4 Identify Site and Content Names
The final required items are the specific names of the documentation you want to sync.
4. Entering Details in TuringOne
Once you have secured your Client Secret and gathered all the necessary IDs, you can complete the setup in the TuringOne platform.
Step 1: Navigate to Integrations
Go to your TuringOne settings and select the
Integrations page. Find and select the
SharePoint Online configuration.
Step 2: Enter Details
Insert the following details into the corresponding fields:
Step 3: Save and Confirm
Click "Save Configuration."
If the set-up is successful, you will receive a success message and see a green
indicator next to your SharePoint integration.
5. Troubleshooting SharePoint Integration
If TuringOne reports an error or fails to connect, use this checklist to quickly identify and resolve the most common issues related to access.
| Problem | Cause | Solution |
|---|---|---|
| Connection Failed: "Unauthorized" |
A. Missing/Incorrect Permissions:
The App Registration is missing the required
Sites.Read.All or
Sites.Selected permission.
|
Verify API Permissions: Check the Microsoft Entra ID App Registration under API Permissions to ensure the necessary permissions are granted and Admin Consent has been applied. |
| Invalid Content/Site | B. Incorrect Content Name: The folder name or site name contains a typo or spaces where none should exist. |
Check Naming:
Ensure the SharePoint Contents/Folder Name is entered
without spaces (e.g., SiteAssets).
|
| "Cannot Connect" | C. Client Secret Expired: The confidential key generated in this Section has expired or SharePoint is hosted behind an additional firewall. | Generate New Secret: Go to Certificates & secrets in the App Registration, create a new secret, and update the value in TuringOne or contact your admin to whitelist TuringOne. |
| Generic Connection Error | D. Incorrect Tenant ID/Client ID: A typo exists in the globally unique identifier. | Double-Check IDs: Verify the Tenant ID and Client ID are copied exactly from the App Registration Overview page. |
6. Sync SharePoint with TuringOne
Since Azure DevOps security policies prevent live-querying SharePoint by third-party apps, you must manually sync the required documentation pages.
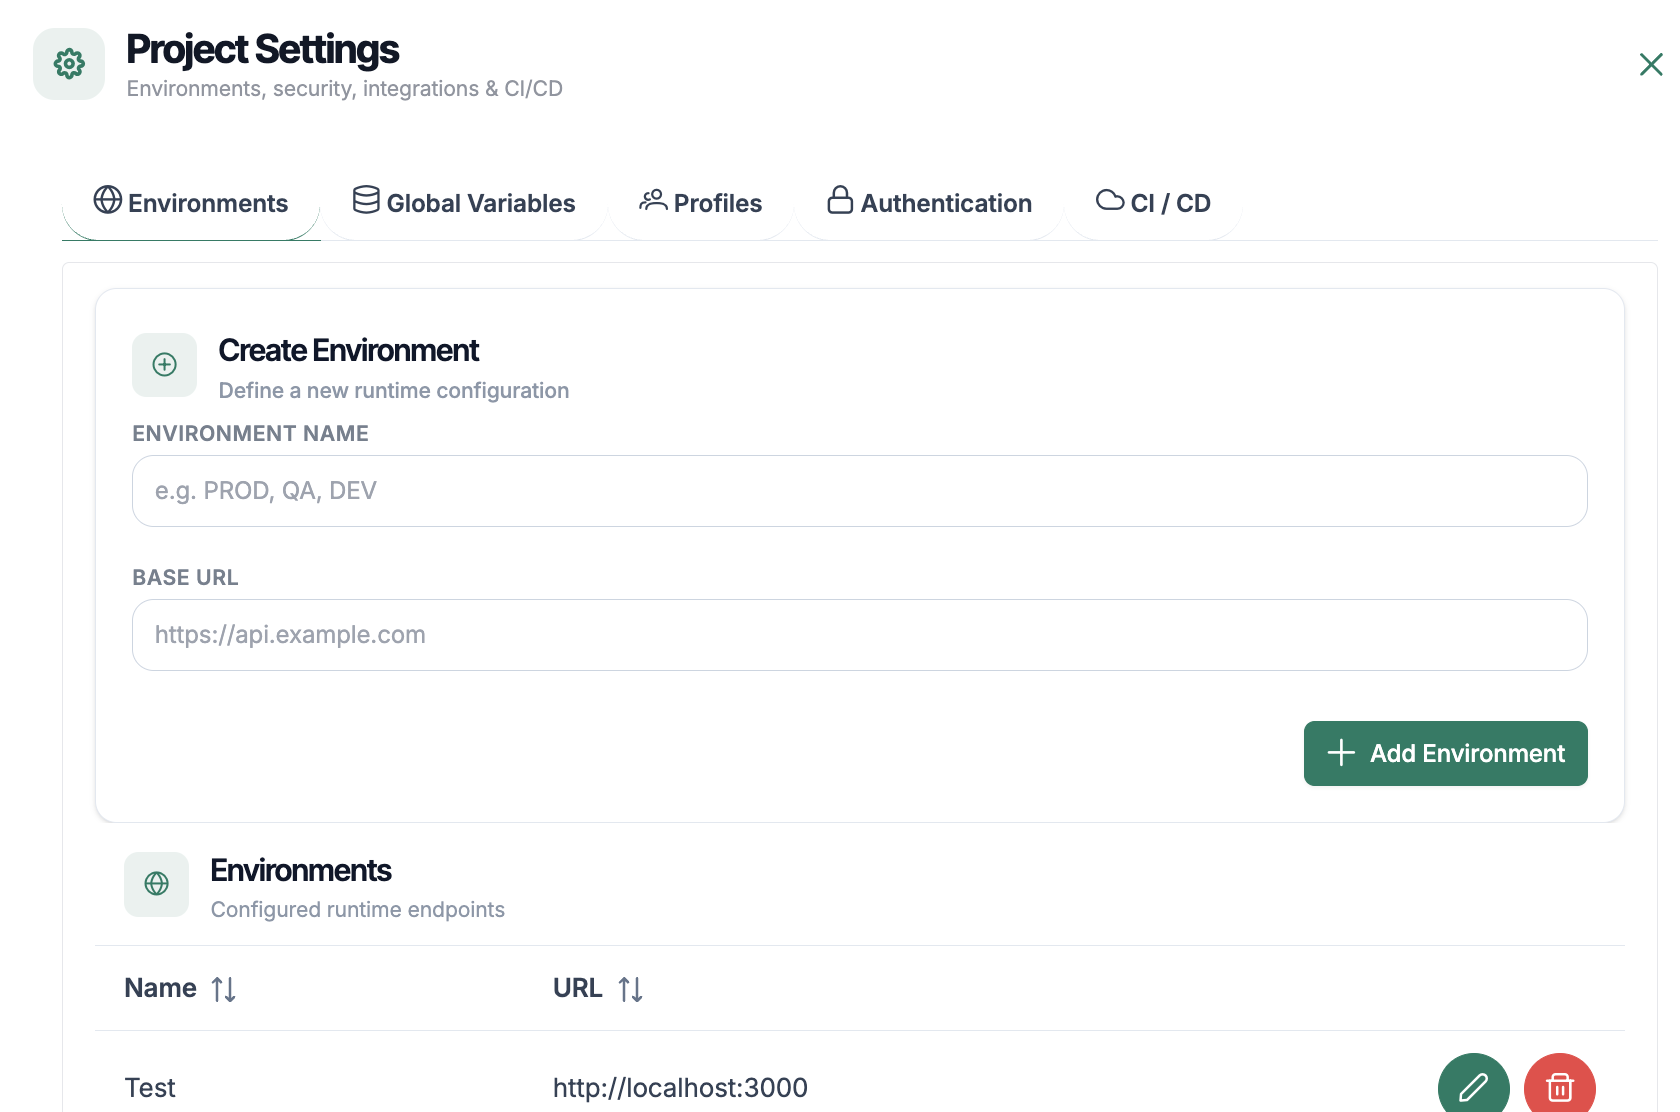
4.2 Environment Management
Environments represent the test execution contexts (DEV, UAT, PRE-PROD, etc.).
Each environment has its own technical configuration.
4.2.1 Creating an Environment
To create an environment:
Main Information
4.2.2 Global Variables
Each environment can contain reusable variables that can be used across all test cases (API tests, End-to-End scenarios, and UI tests).
These variables are defined once and can be used globally across all tests in the project.
Variables with Entities
A variable can be defined with multiple entities in order to represent different functional contexts.
Example
Each entity then has a specific value per environment.
| Environment | Professional Entity | Personal Entity |
|---|---|---|
| DEV | pro.dev@email.com | perso.dev@email.com |
| UAT | pro.uat@email.com | perso.uat@email.com |
| PRE-PROD | pro@enterprise.com | perso@gmail.com |
Advantages
Thanks to this mechanism, tests remain dynamic, consistent, and easy to maintain, regardless of the execution environment.
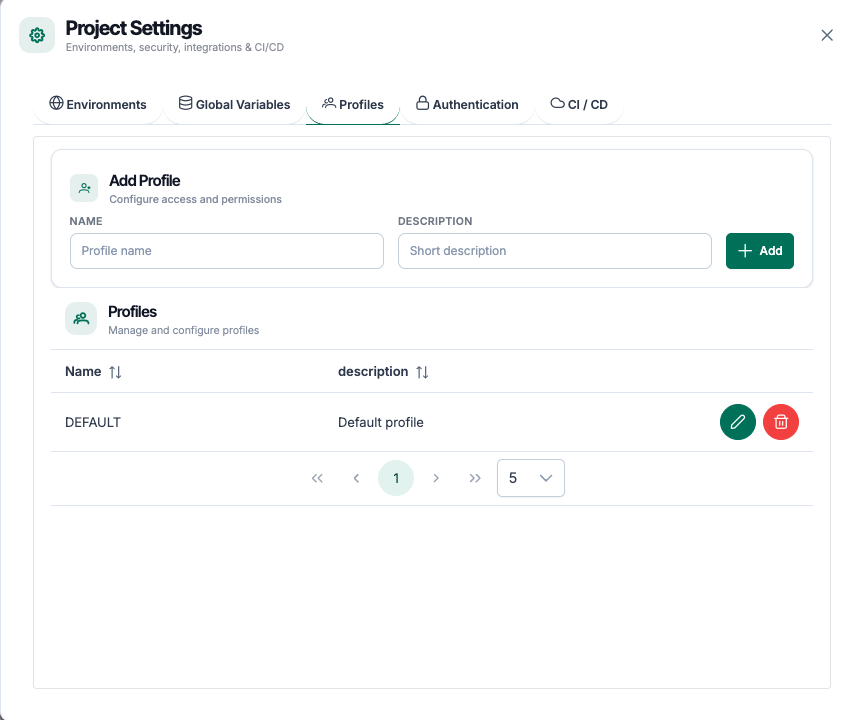
4.3 Profiles
4.3.1 Execution Profiles
Execution profiles allow you to group parameters for a given execution context.
Examples of profiles:
This allows you to run the same tests without any modification, simply by changing the execution profile.
4.4 Authentication
The security of sensitive information is a fundamental aspect of TuringOne.
4.4.1 API Keys and Tokens
Secrets include in particular:
These elements:
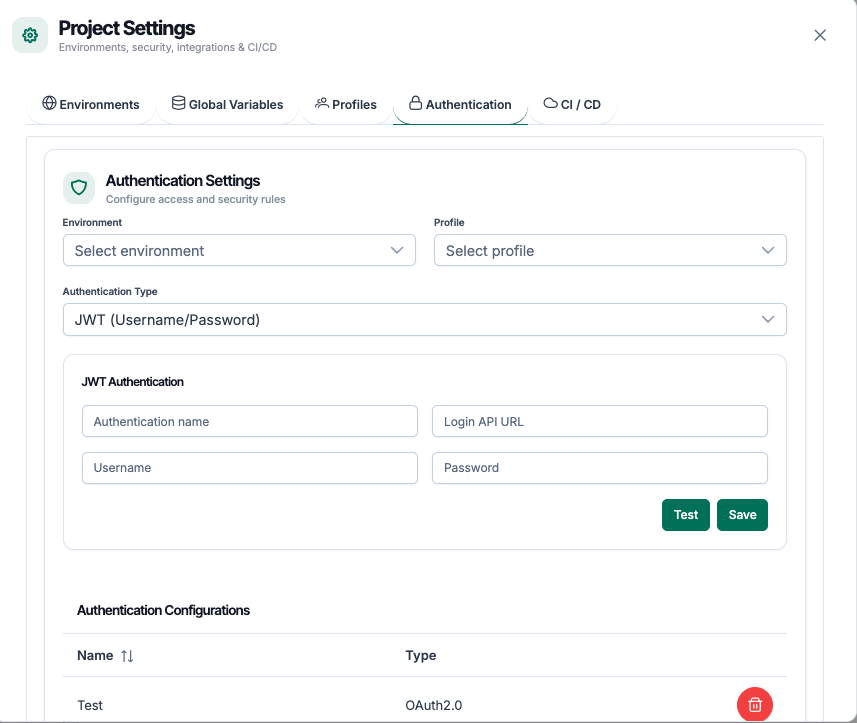
5. Documentation & Requirements Module
The Documentation & Requirements module is the functional foundation of TuringOne. It enables the platform to understand business logic, structure requirements, and intelligently feed test generation.
The clearer and better organized the documentation is, the higher the value delivered by AI.
5.1 Document Import
TuringOne allows importing functional documents in order to build a centralized business understanding.
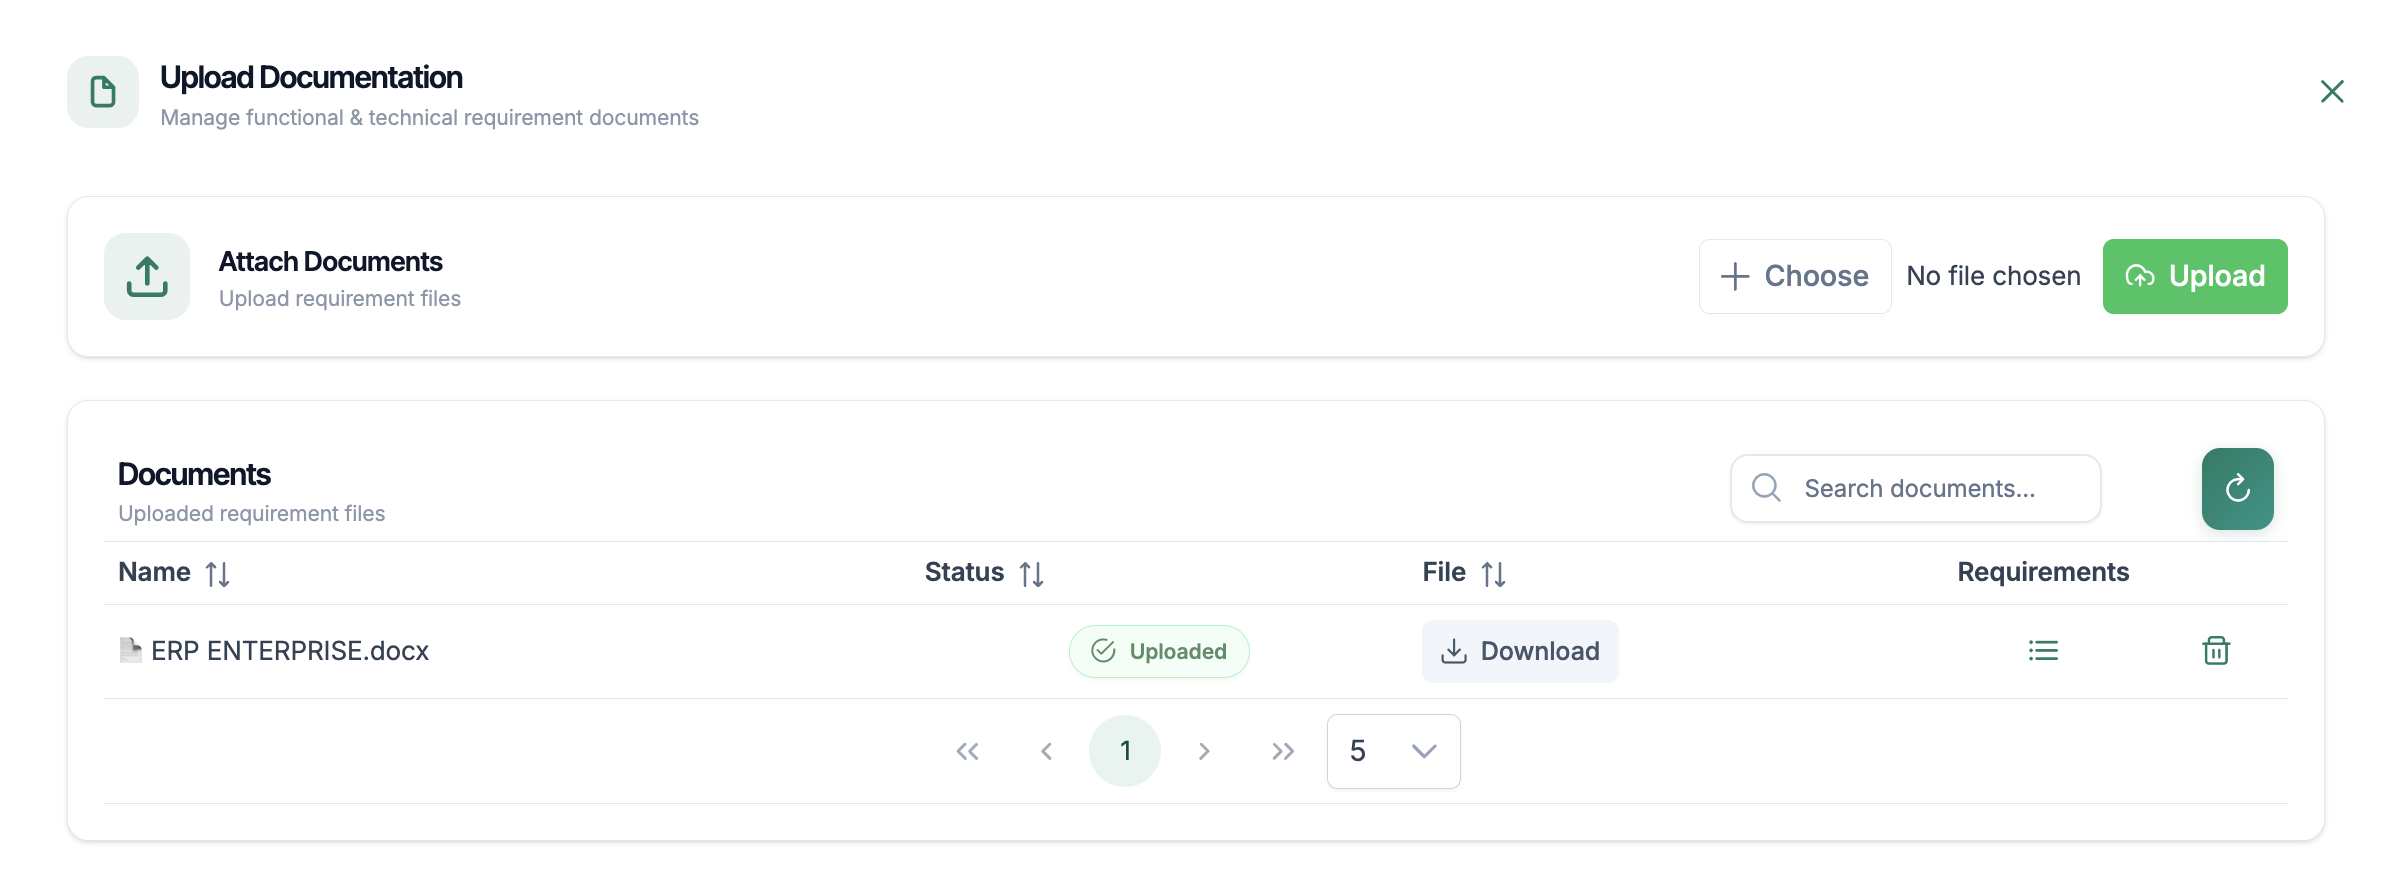
5.1.1 Supported Formats
The commonly supported formats include:
These documents may contain:
5.1.2 Document Organization
During the import process, TuringOne:
Proper organization enables:
Import Steps
Document Import via SharePoint – TuringOne
TuringOne allows you to automatically import documents from a Microsoft SharePoint workspace in order to feed the project knowledge base and application requirements, without any manual file upload.
This feature is particularly useful when your documents are already stored and maintained in SharePoint.
Prerequisites
Before launching a SharePoint import, make sure that:
-
- A SharePoint configuration has been created in TuringOne
- The SharePoint site access is valid
- Document access permissions have been granted
(The configuration is performed only once by a project administrator.)
Launching a SharePoint Import
Step 1 — Access the Import Page
From your TuringOne project:
Project > Documents > Import from SharePoint
Step 2 — Select a SharePoint Configuration
If multiple SharePoint connections exist, select the desired configuration:
Step 3 — Launch the Synchronization
Click on:
Synchronize with SharePoint
TuringOne then analyzes:
No file is downloaded to the server — only the structure and metadata are synchronized.
Change Detection
During each synchronization, TuringOne compares:
It automatically identifies:
| Status | Description |
|---|---|
| New | Document added in SharePoint |
| Modified | Document updated in SharePoint |
| Unchanged | No change detected |
| Deleted | Document removed from SharePoint but still present in TuringOne |
Handling Deleted Documents
When a document is deleted on the SharePoint side:
- It is marked as "To be confirmed" in TuringOne - The user can choose to:This step prevents accidental deletion of business-critical data.
Synchronization Summary
At the end of the import, TuringOne displays the detected requirements. A detailed view is available for consultation.
Future Synchronizations
Subsequent imports are incremental:
Data Security
Best Practices
Result
You now have a documentation base synchronized between:
SharePoint ↔ TuringOne
Ready to be leveraged for:
5.2 User Story Management
User Stories represent structured functional requirements. TuringOne allows them to be managed in an automated way.
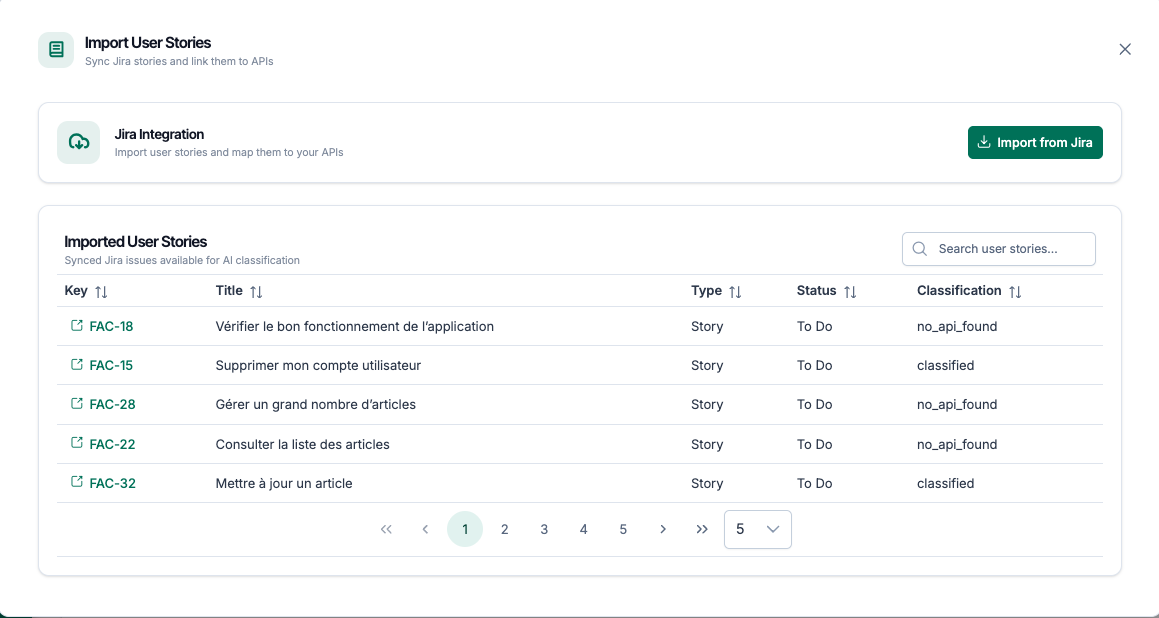
5.2.2 Importing User Stories from Jira
When Jira is connected, TuringOne allows you to:
The imported information includes:
This synchronization ensures full traceability between requirements and tests.
5.3 AI-Driven Intelligent Analysis
Once documents and User Stories are imported, TuringOne activates its intelligent analysis engine. At this stage, the user must click the synchronization button.
5.3.1 Functional Understanding
The AI analyzes:
It is able to:
This understanding helps reduce human interpretation effort and improves the consistency of the generated tests.
5.3.2 Automatic Links
Thanks to intelligent analysis, TuringOne automatically creates links between:
These links enable:

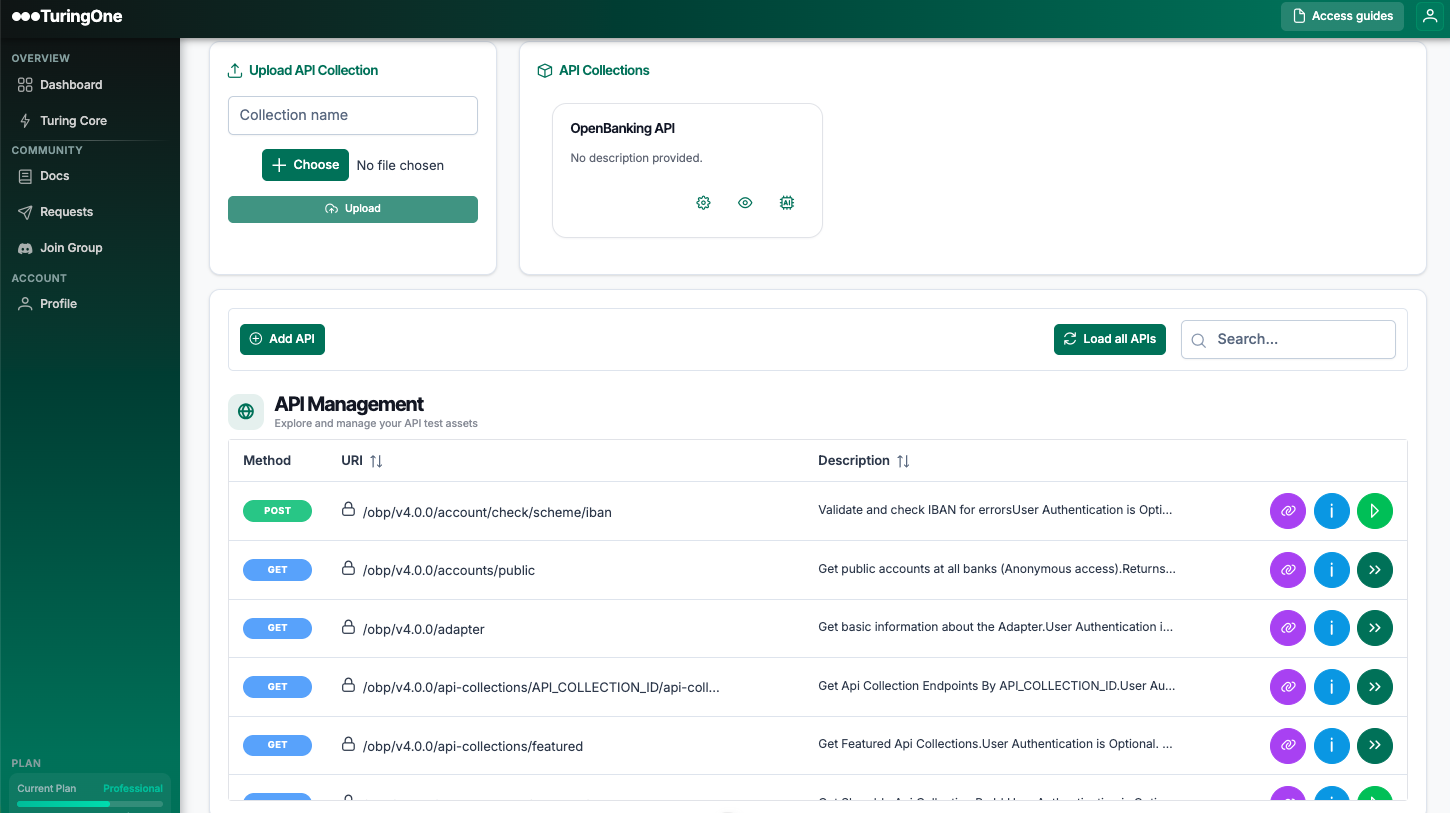
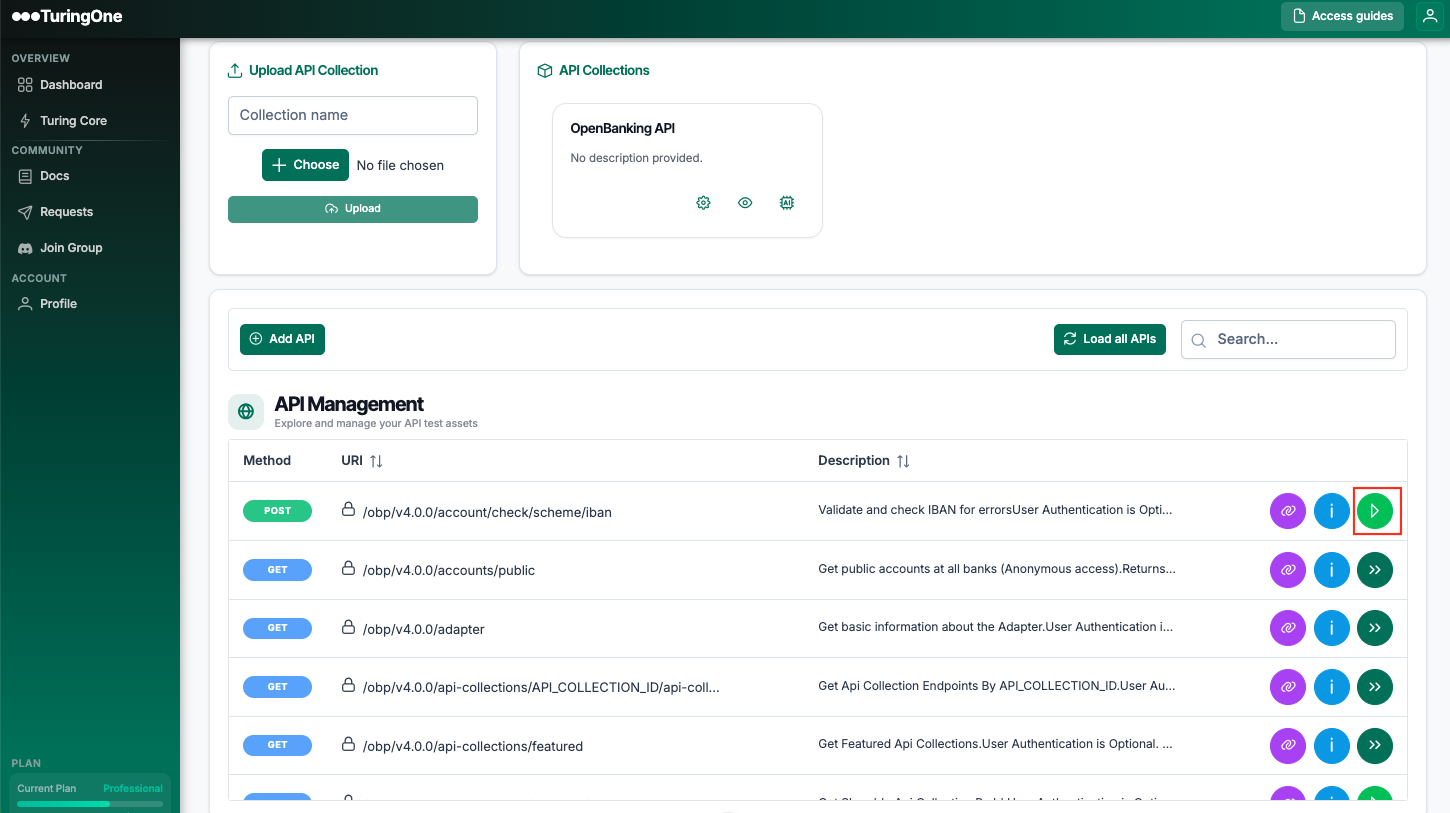
6. API Management Module
The API Management module allows you to centralize, analyze, and leverage a project's APIs within TuringOne.
It represents the essential bridge between functional requirements and automated tests.
6.1 Contract Services Import
TuringOne relies on Swagger / OpenAPI/ Collection Postman files as the technical source of truth for APIs.
6.1.1 Initial Import
The initial import allows all APIs of the project to be integrated.
Import steps
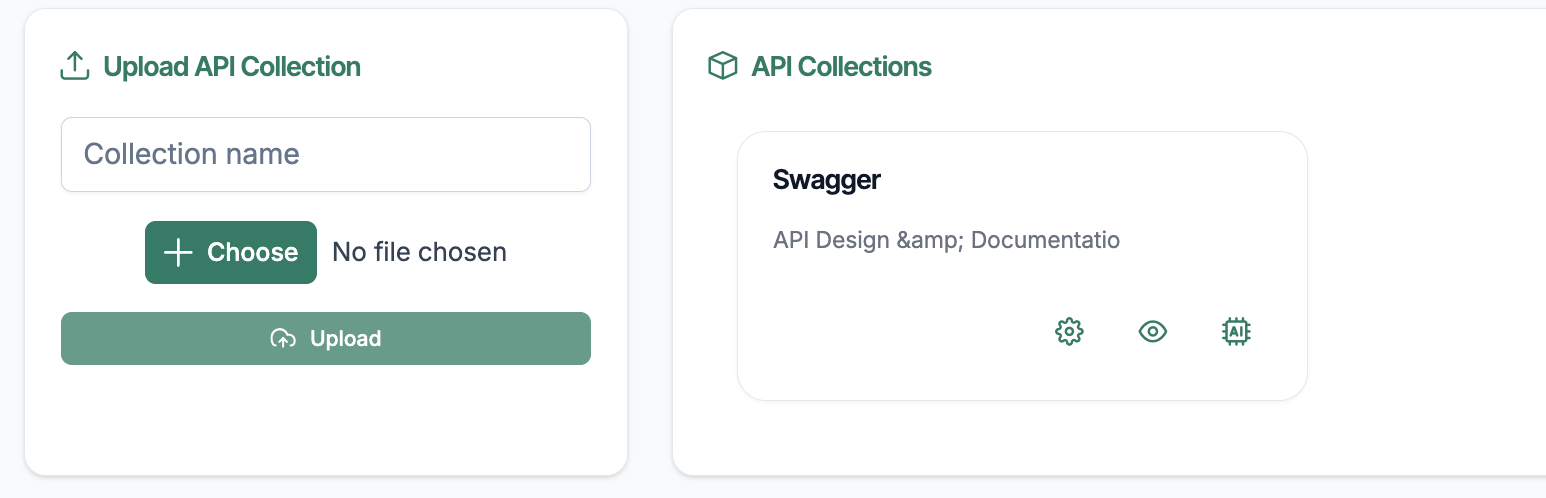
After the upload, an API collection is created and you can either modify it, browse the different endpoints, or create usable tests. Click on Show endpoints:
6.1.2 API definition Update
APIs evolve frequently. TuringOne allows you to update an existing API definition without losing the work already completed.
During an update:
This approach enables controlled and reliable management of technical evolutions.
6.2 API Visualization
Once imported, APIs are accessible through a structured and readable view.
6.2.1 Endpoints
Each endpoint is displayed with:
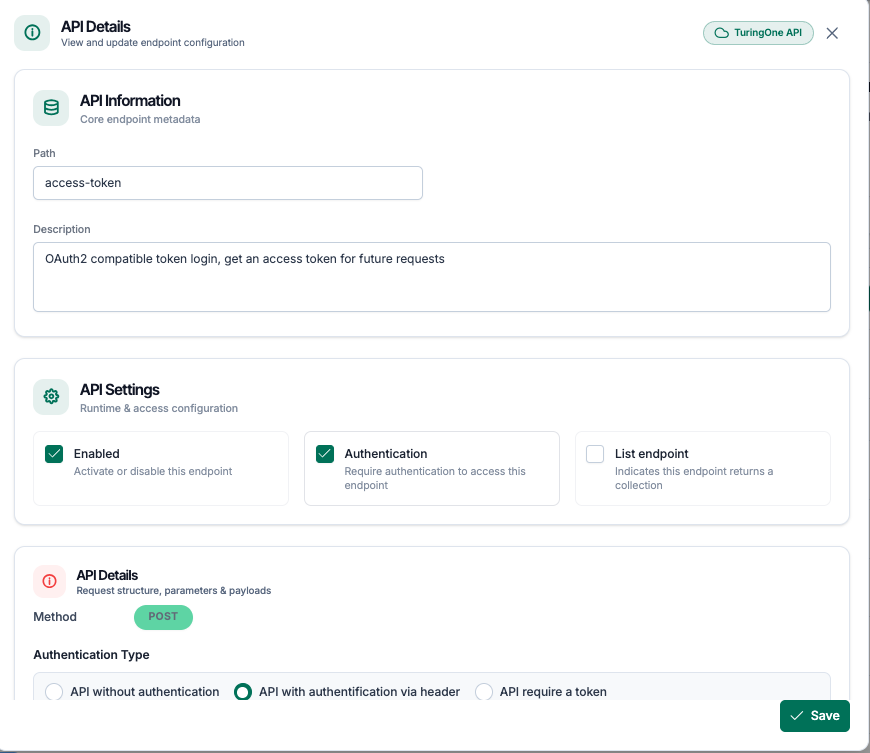
The user can quickly:
6.2.2 Methods
For each endpoint, TuringOne displays:
This facilitates:
6.2.3 Parameters
Parameters are presented in a detailed manner:
Each parameter includes:
6.3 Intelligent Synchronization
Intelligent synchronization is one of the major differentiating elements of TuringOne.
It enables the automatic linkage between the functional world and the technical world.
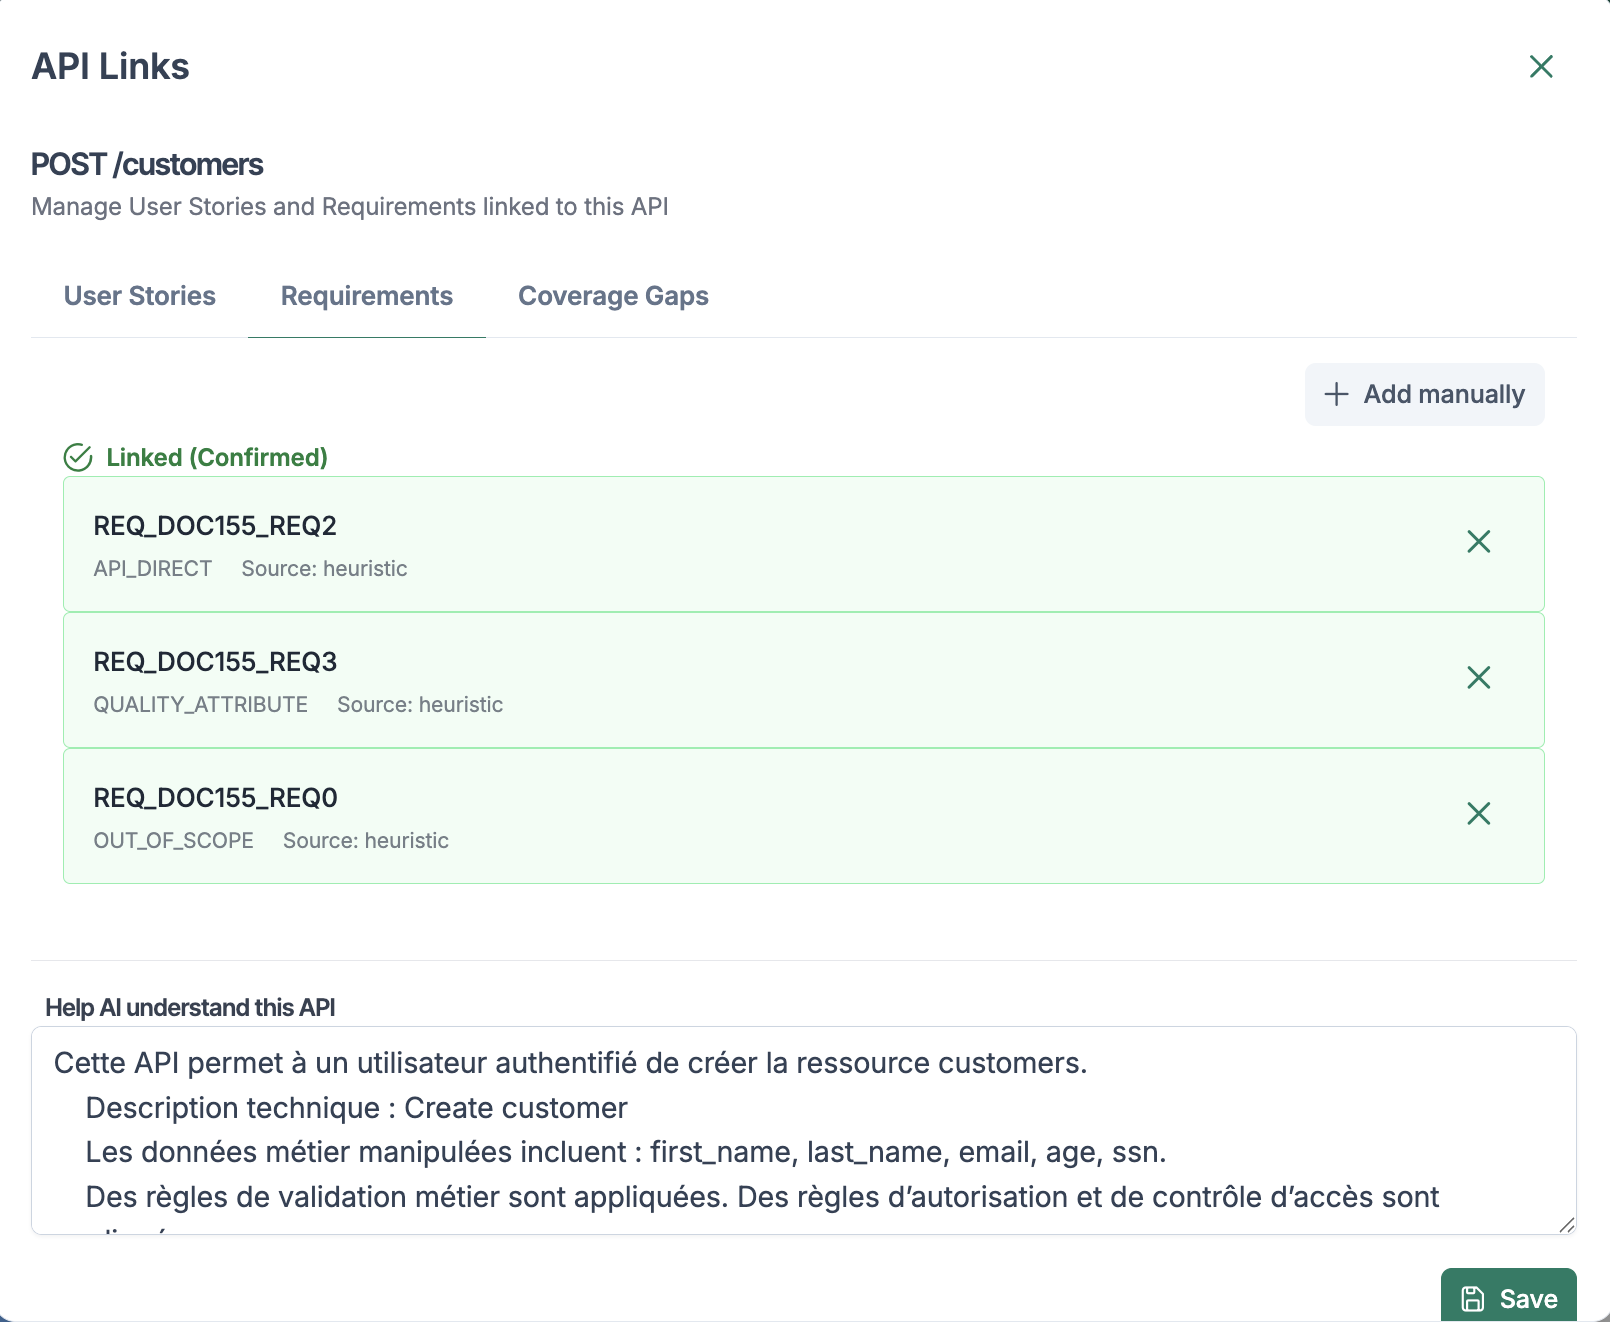
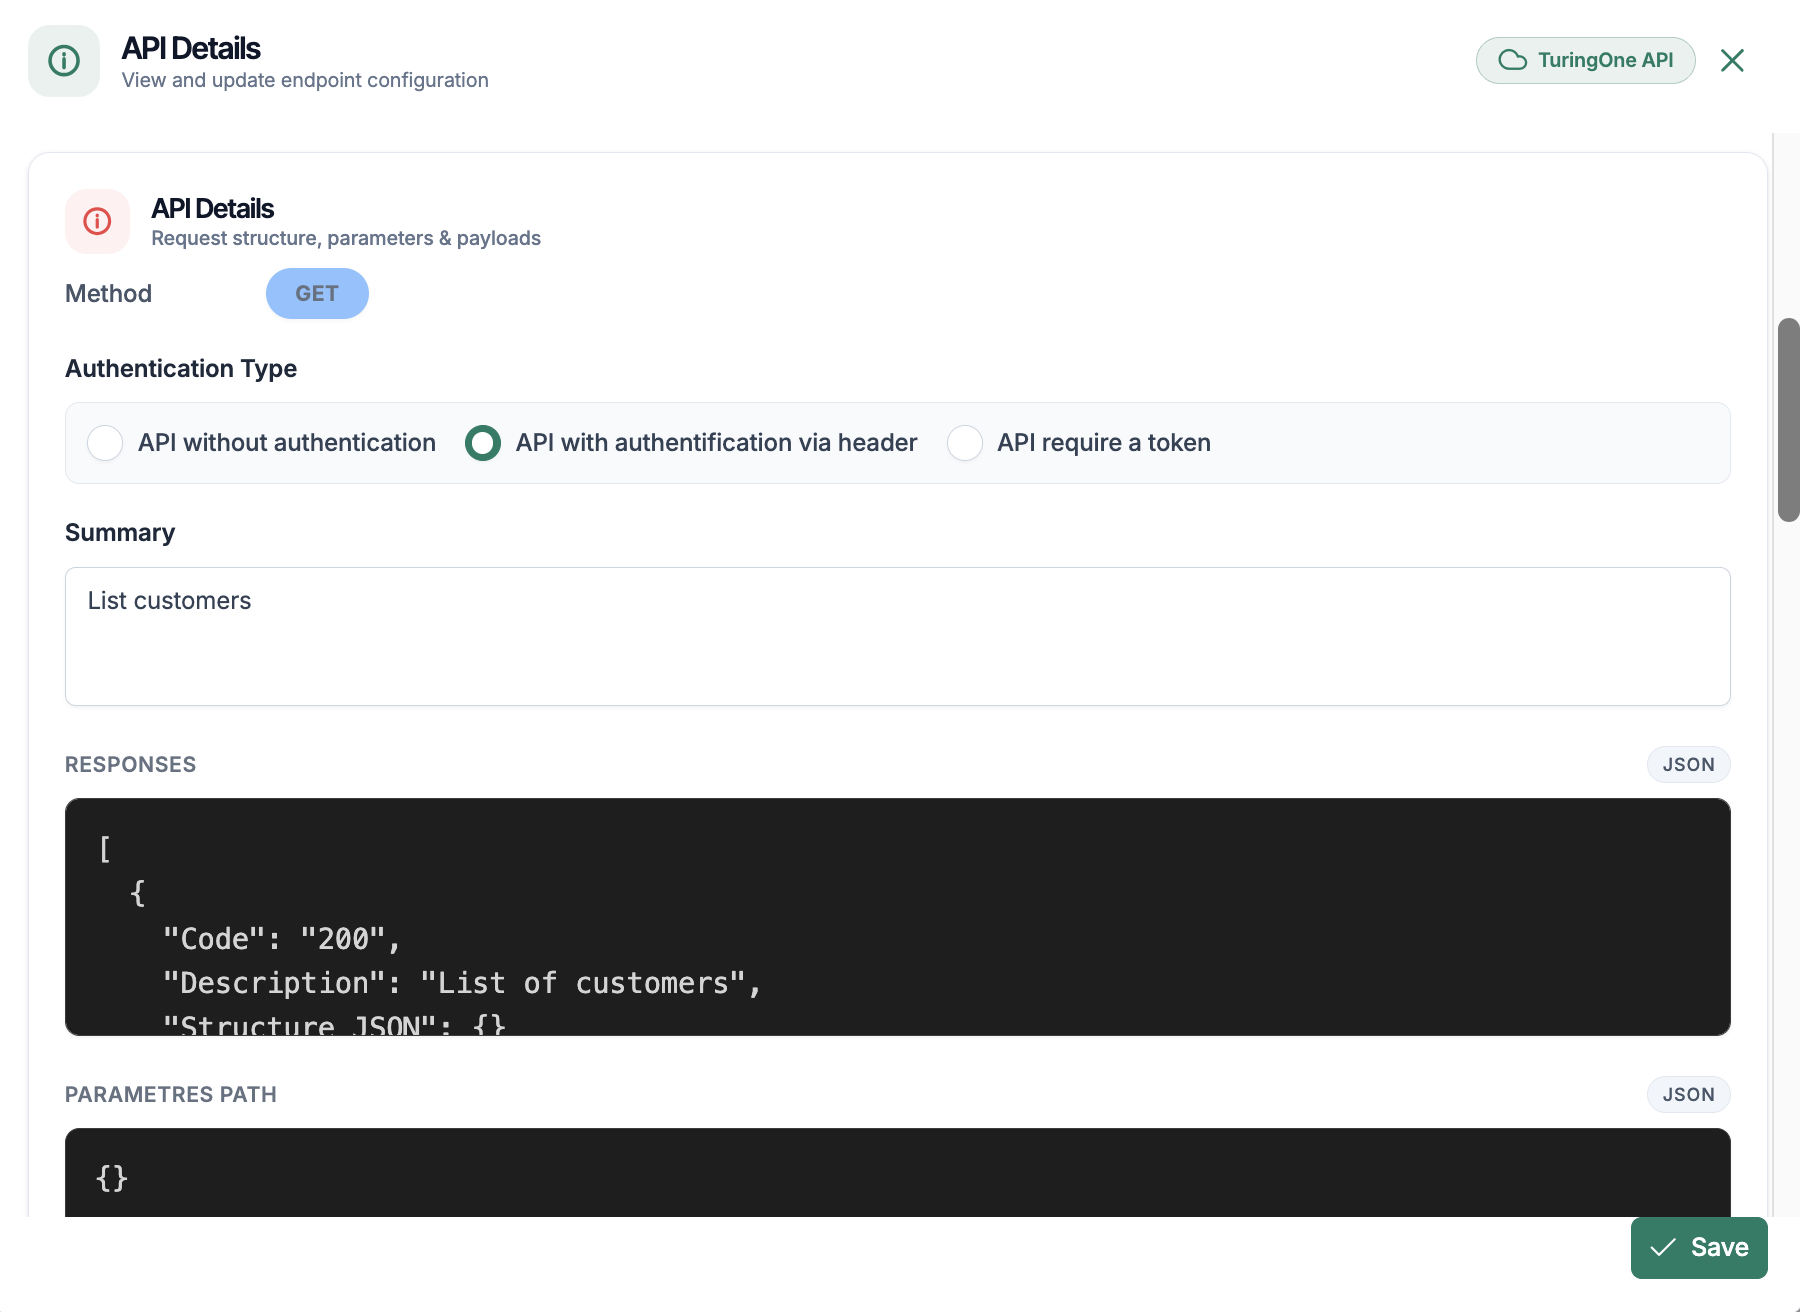
6.3.1 User Stories ↔ API Links
Thanks to AI-driven analysis:
These links make it possible to:
6.3.2 Documentation ↔ API Links
In the same way, TuringOne links:
This enables:
7. API Tests Module
The API Tests module allows users to generate, manage, and execute intelligent API tests, directly from imported APIs and requirements analyzed by TuringOne.
This module represents the core of functional and technical test automation.
7.1 Automatic Test Generation
Automatic generation makes it possible to create test cases without writing code, while maintaining a consistent business and technical logic.
7.1.1 Endpoint Selection
To generate tests:
The user can target:
This approach enables fine-grained and controlled test generation.
7.1.2 Types of Generated Tests
TuringOne automatically generates several types of tests, including:
The generated tests take into account:
This generation approach makes it possible to achieve fast and relevant API coverage.
7.1.2 Types of Generated Tests
TuringOne automatically generates several types of tests, including:
The generated tests take into account:
This generation approach makes it possible to achieve fast and relevant API coverage.
7.2 Test Case Management
Once generated, test cases can be viewed, enriched, and organized.
7.2.1 Positive Test Cases
Positive test cases verify that the API behaves correctly under normal conditions.
They generally include:
These tests serve as a functional reference.
7.2.2 Negative Test Cases
Negative test cases help validate robustness and error handling.
Examples:
They are essential to:
7.2.3 Generated Data
Test data is automatically generated by AI:
The user can:
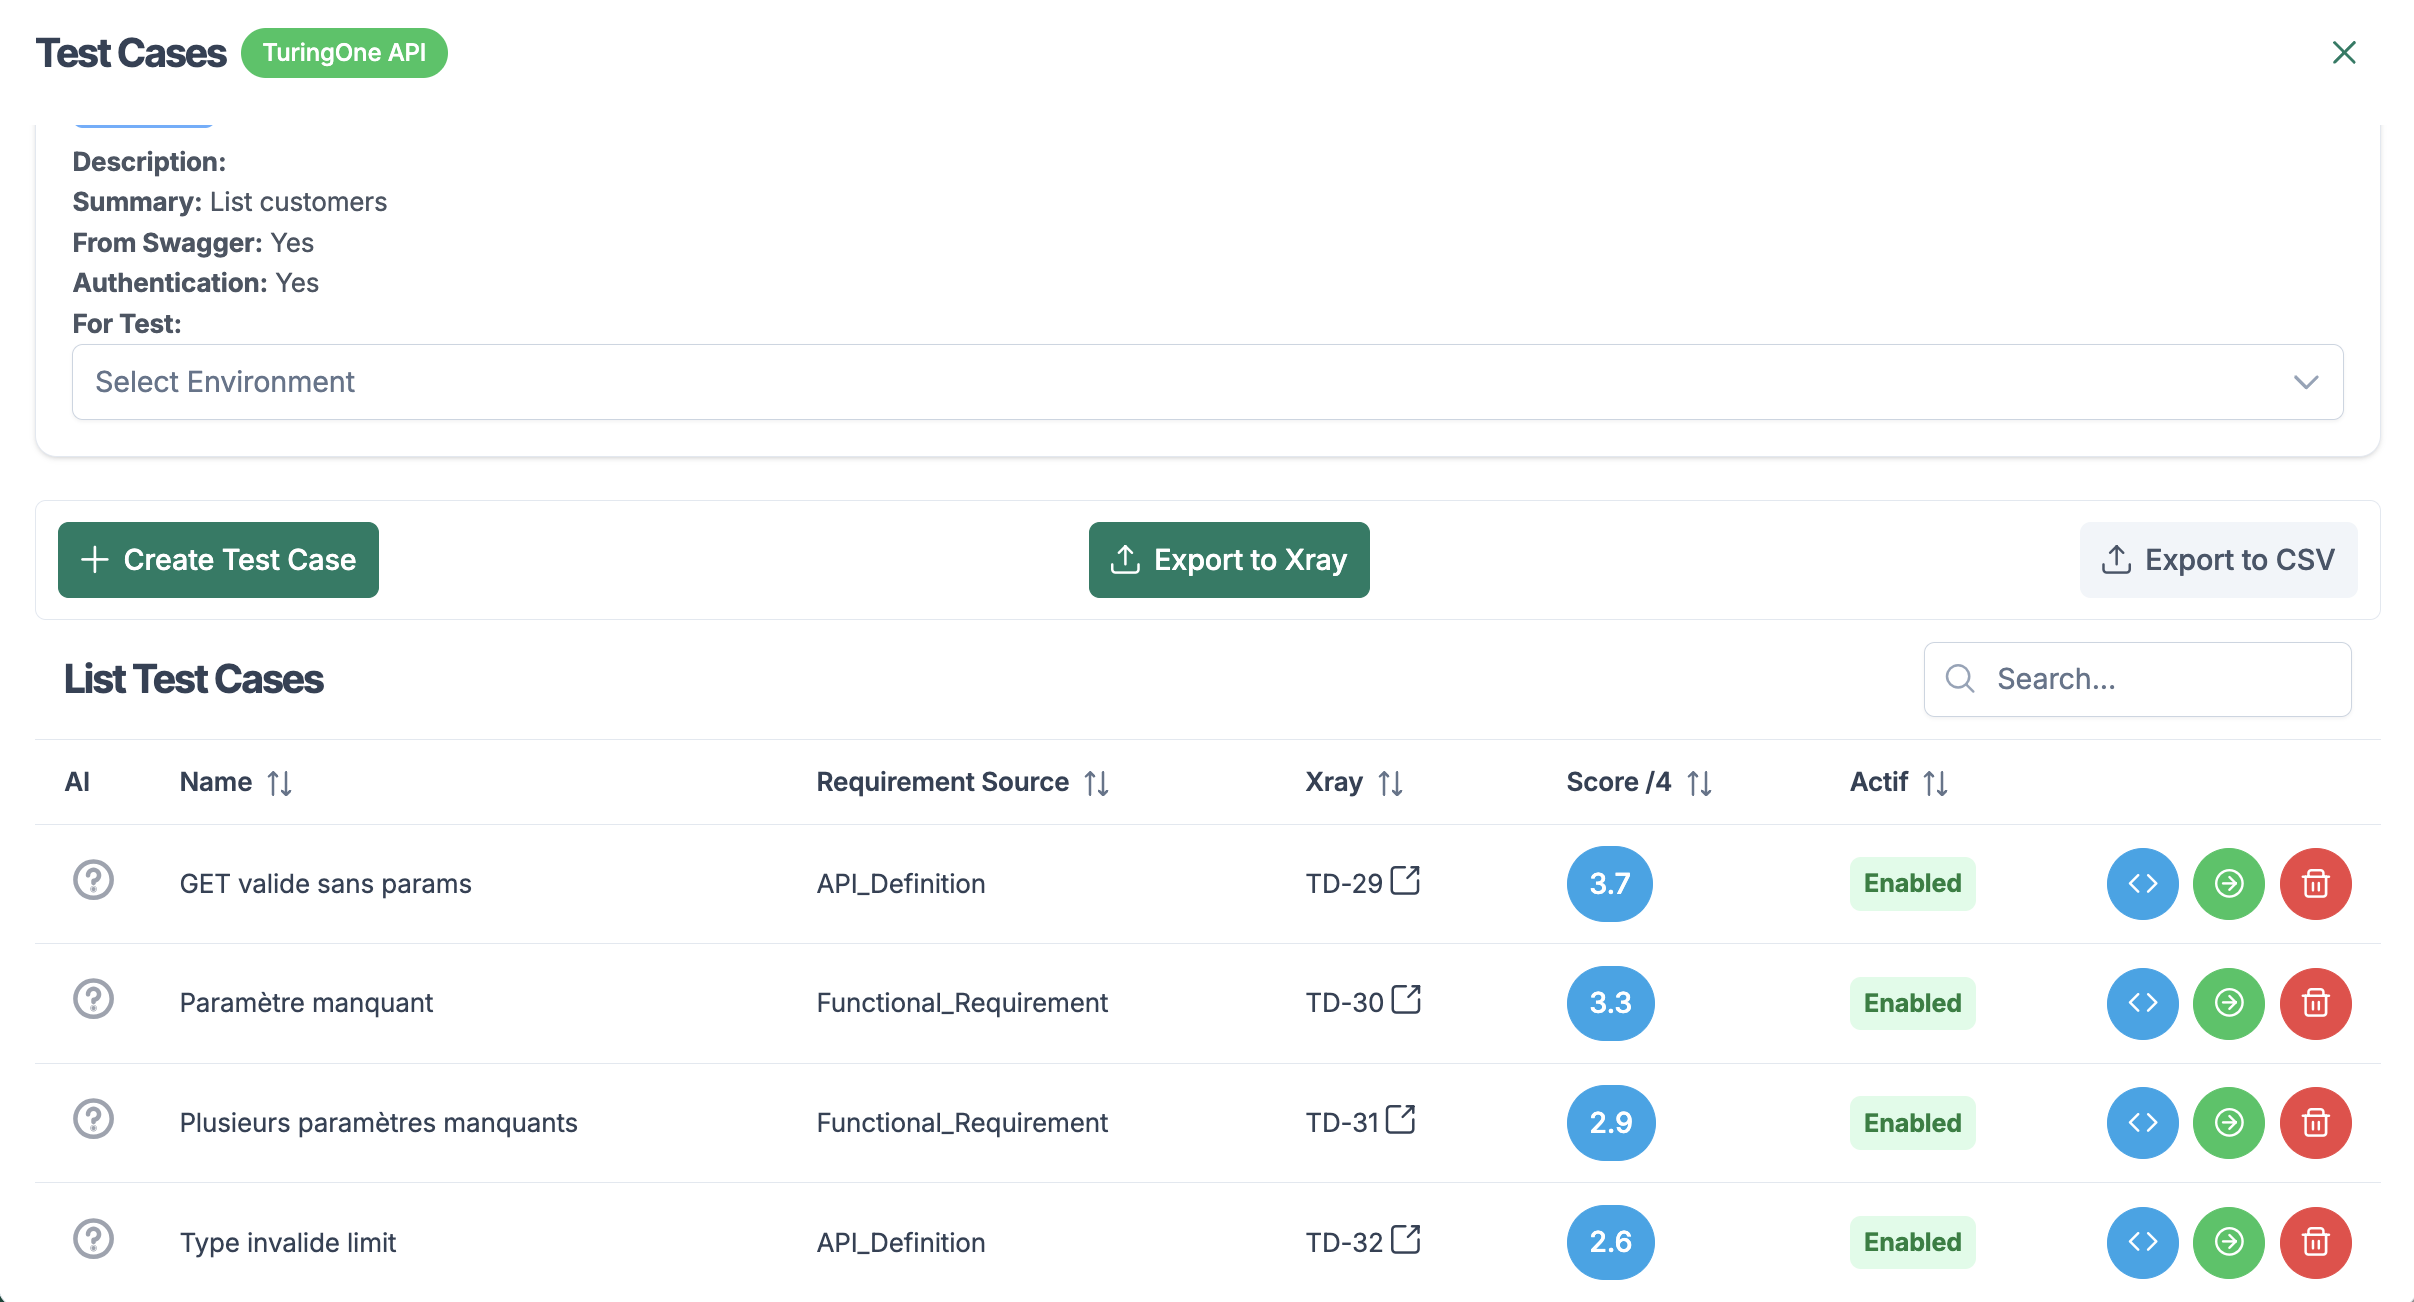
7.2.4 Integration of AI-Generated Test Cases with Xray (Jira)
After test case generation, these test cases can then be linked and synchronized with Xray (Jira) in order to be directly integrated into your existing test management process.
Connection with Xray
TuringOne can connect to your Jira + Xray instance via a secure API.
An Xray configuration is performed only once by an administrator:
Export and Linking to Xray
In TuringOne:
Project > Test Cases > Generated by AI
7.2.4 Integration of AI-Generated Test Cases with Xray (Jira)
After test case generation, TuringOne allows these test cases to be linked and synchronized with Xray (Jira), enabling direct integration into your existing test management process.
Connection with Xray
TuringOne can connect to your Jira + Xray instance via a secure API.
An Xray configuration is performed once by an administrator:
Export and Linking to Xray
In TuringOne:
Project > Test Cases > Generated by AI
Click on: Export To Xray
TuringOne automatically:
Bidirectional Linking
After export:
This enables:
Traceability Management
TuringOne automatically maintains:
| Element | Traceability |
|---|---|
| Document → Requirement | Yes |
| Requirement → AI Test Case | Yes |
| AI Test Case → Xray Test | Yes |
| Execution Result → Xray | Yes |
This chain guarantees complete test coverage from documentation to execution.
Update Synchronization
If a document is:
Then TuringOne:
The user always retains control before publishing.
Security and Governance
Best Practices
Result
Thanks to this integration:
Documentation → AI → Test Cases → Xray → Execution
Your entire testing lifecycle becomes:
7.3 Execution Variables and Environments Management in TuringOne
During API test execution, TuringOne must handle dynamic data such as identifiers, tokens, users, amounts, dates, etc.
To ensure repeatable, configurable, and multi-environment executions, TuringOne integrates an advanced execution variables management system.
Multi-Environment Management
TuringOne allows defining multiple execution environments:
Each environment has its own:
This enables executing the same test cases across multiple environments without modifying the test script.
Types of Variables in TuringOne
TuringOne distinguishes three types of variables, each designed to address a specific need.

1. Static Variables
Static variables are fixed values per environment, but can be overridden at the test case level if needed.
Examples:
Characteristics:
Example:
| Variable | DEV | UAT | PRE-PROD |
|---|---|---|---|
static.id_product |
17 | 89 | 117 |
2. Random Variables
Random variables generate a new dynamic value at each execution.
Examples:
Characteristics:
Example:
email = random.email
3. Global Variables
Global variables represent information shared across the entire project, independent of environments.
Examples:
Characteristics:
Variable Lifecycle During Execution
Local Override per Test Case
A test case can:
This allows adapting a test without modifying the global configuration.
Data Security
Benefits
Result
TuringOne guarantees a flexible, robust, and scalable execution of automated tests, regardless of the target environment.
7.3 API Test Execution
Once a test case is ready, the user can launch its execution.
7.3.1 Launching a Test Case
The test is executed automatically, without manual intervention.
7.3.2 Viewing Results
After execution, the user can view:
The results allow:
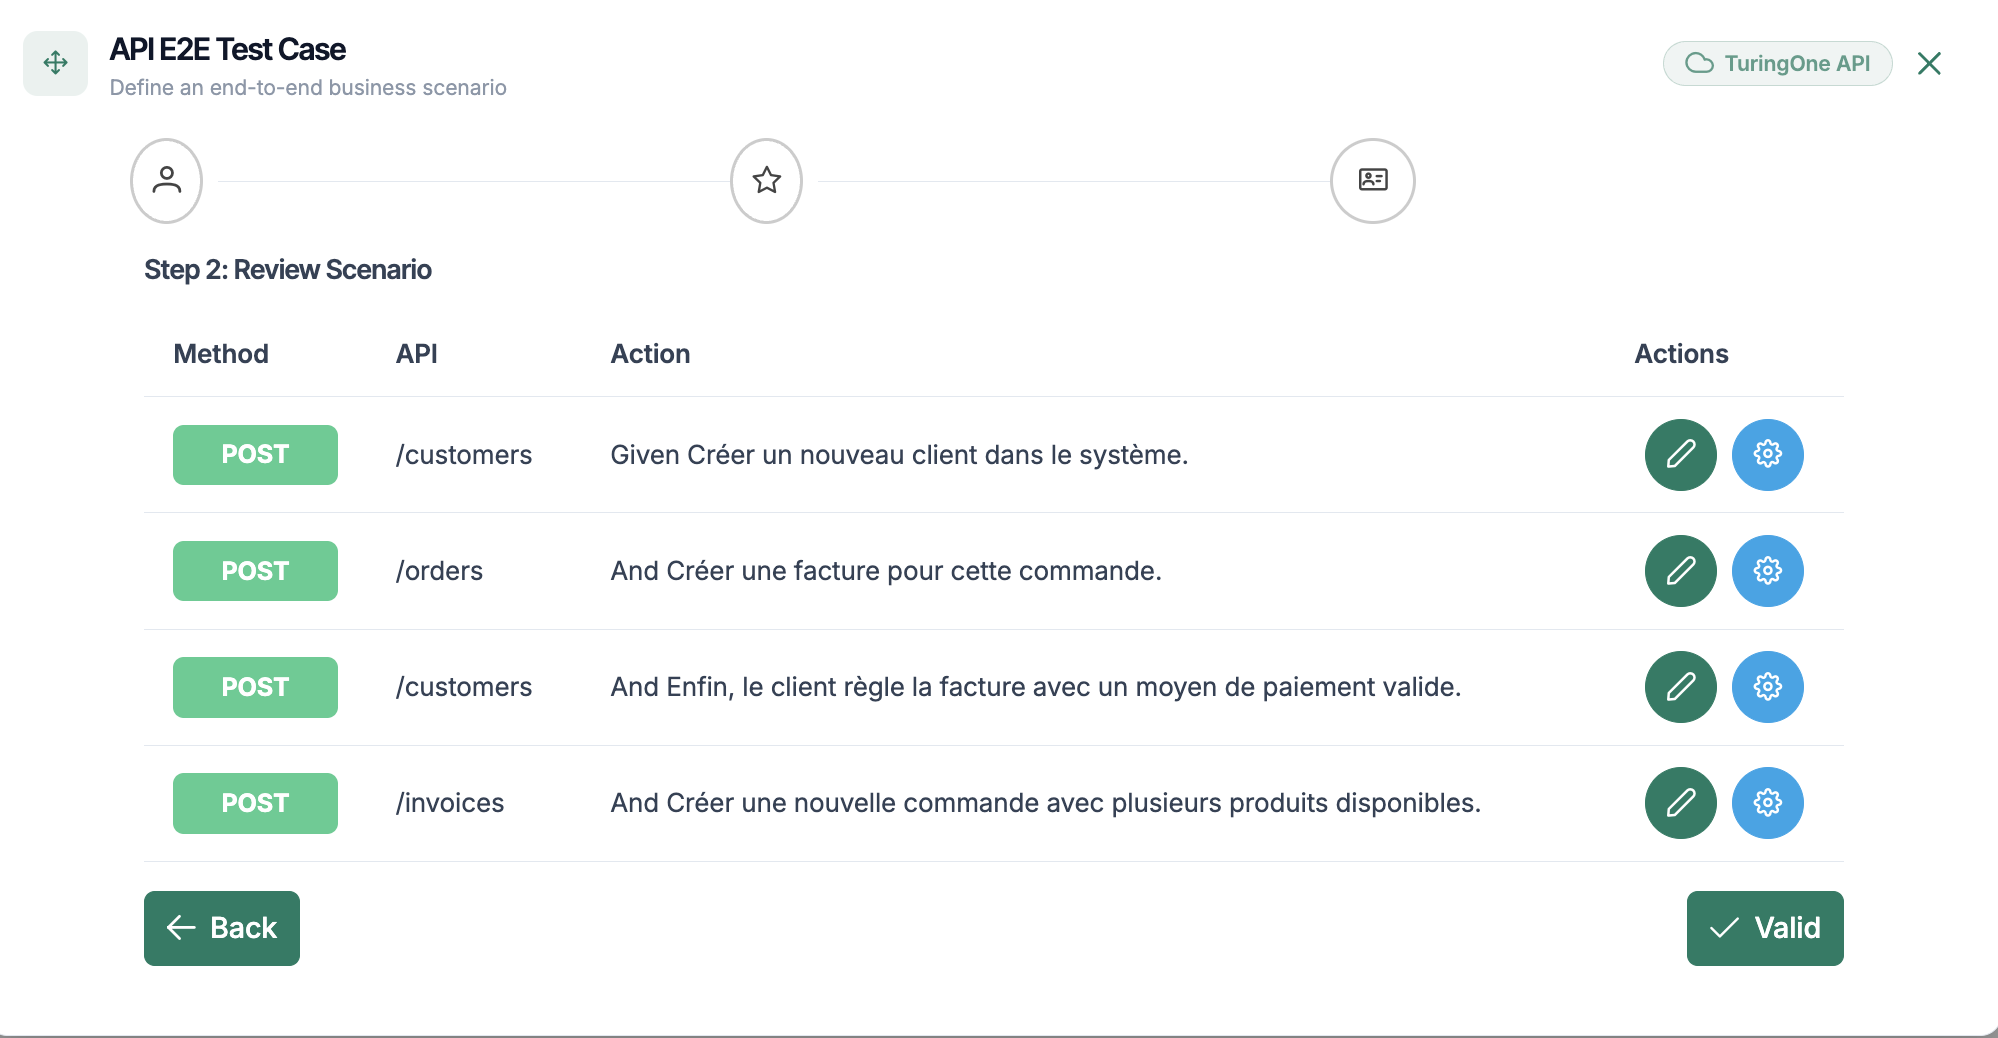
8. E2E API Scenarios Module (Workflows)
The API Scenarios (Workflows) module allows you to build End-to-End tests by chaining multiple API calls following a coherent business logic.
It is a key TuringOne module for validating complete business workflows, beyond isolated endpoint unit tests.
8.1 Creating an End-to-End Scenario
An End-to-End scenario represents a business workflow, composed of multiple API steps executed in a specific order.
8.1.1 Adding Steps
To create a scenario:

Steps are then created, and each step corresponds to:
8.1.2 Execution Order
The execution order of steps is critical in an End-to-End scenario.
The user can:
This chaining allows you to simulate real-life use cases such as:
8.2 Shared Data Management
One of the key strengths of API scenarios in TuringOne is the intelligent management of shared data between steps.
8.2.1 Generated Variables
A step can produce data that can be reused by subsequent steps.
Examples:
This data is automatically extracted from:
They are stored as scenario variables.
8.2.2 Reused Variables
The variables created can be reused in:
This allows:
The user can clearly visualize:
8.3 Execution and Validation
Once the scenario is defined, it can be executed as a single and coherent test.
8.3.1 Execution Logs
During execution, TuringOne provides detailed logs:
These logs make it easier to:
8.3.2 Step-by-Step Results
After execution, the user can view:
This detailed view makes it possible to:
9.3 Test Execution
Once scenarios are created, they can be executed automatically.
9.3.1 Test Launch
To launch a UI test:
The tests are run automatically in a controlled browser.
9.3.2 Visual Monitoring
During execution, the user can monitor:
This visual monitoring helps with:
9.3.3 Results
At the end of execution, TuringOne displays:
These results enable:

9. UI Tests Module
The UI Tests module allows users to design and execute automated tests on the user interface, based on the application’s real functional user journeys.
In TuringOne, UI tests are designed to be readable, maintainable, and business-aligned, without relying excessively on technical complexity.
9.1 UI Feature Management
UI Features help structure tests according to the functionalities visible to the end user.
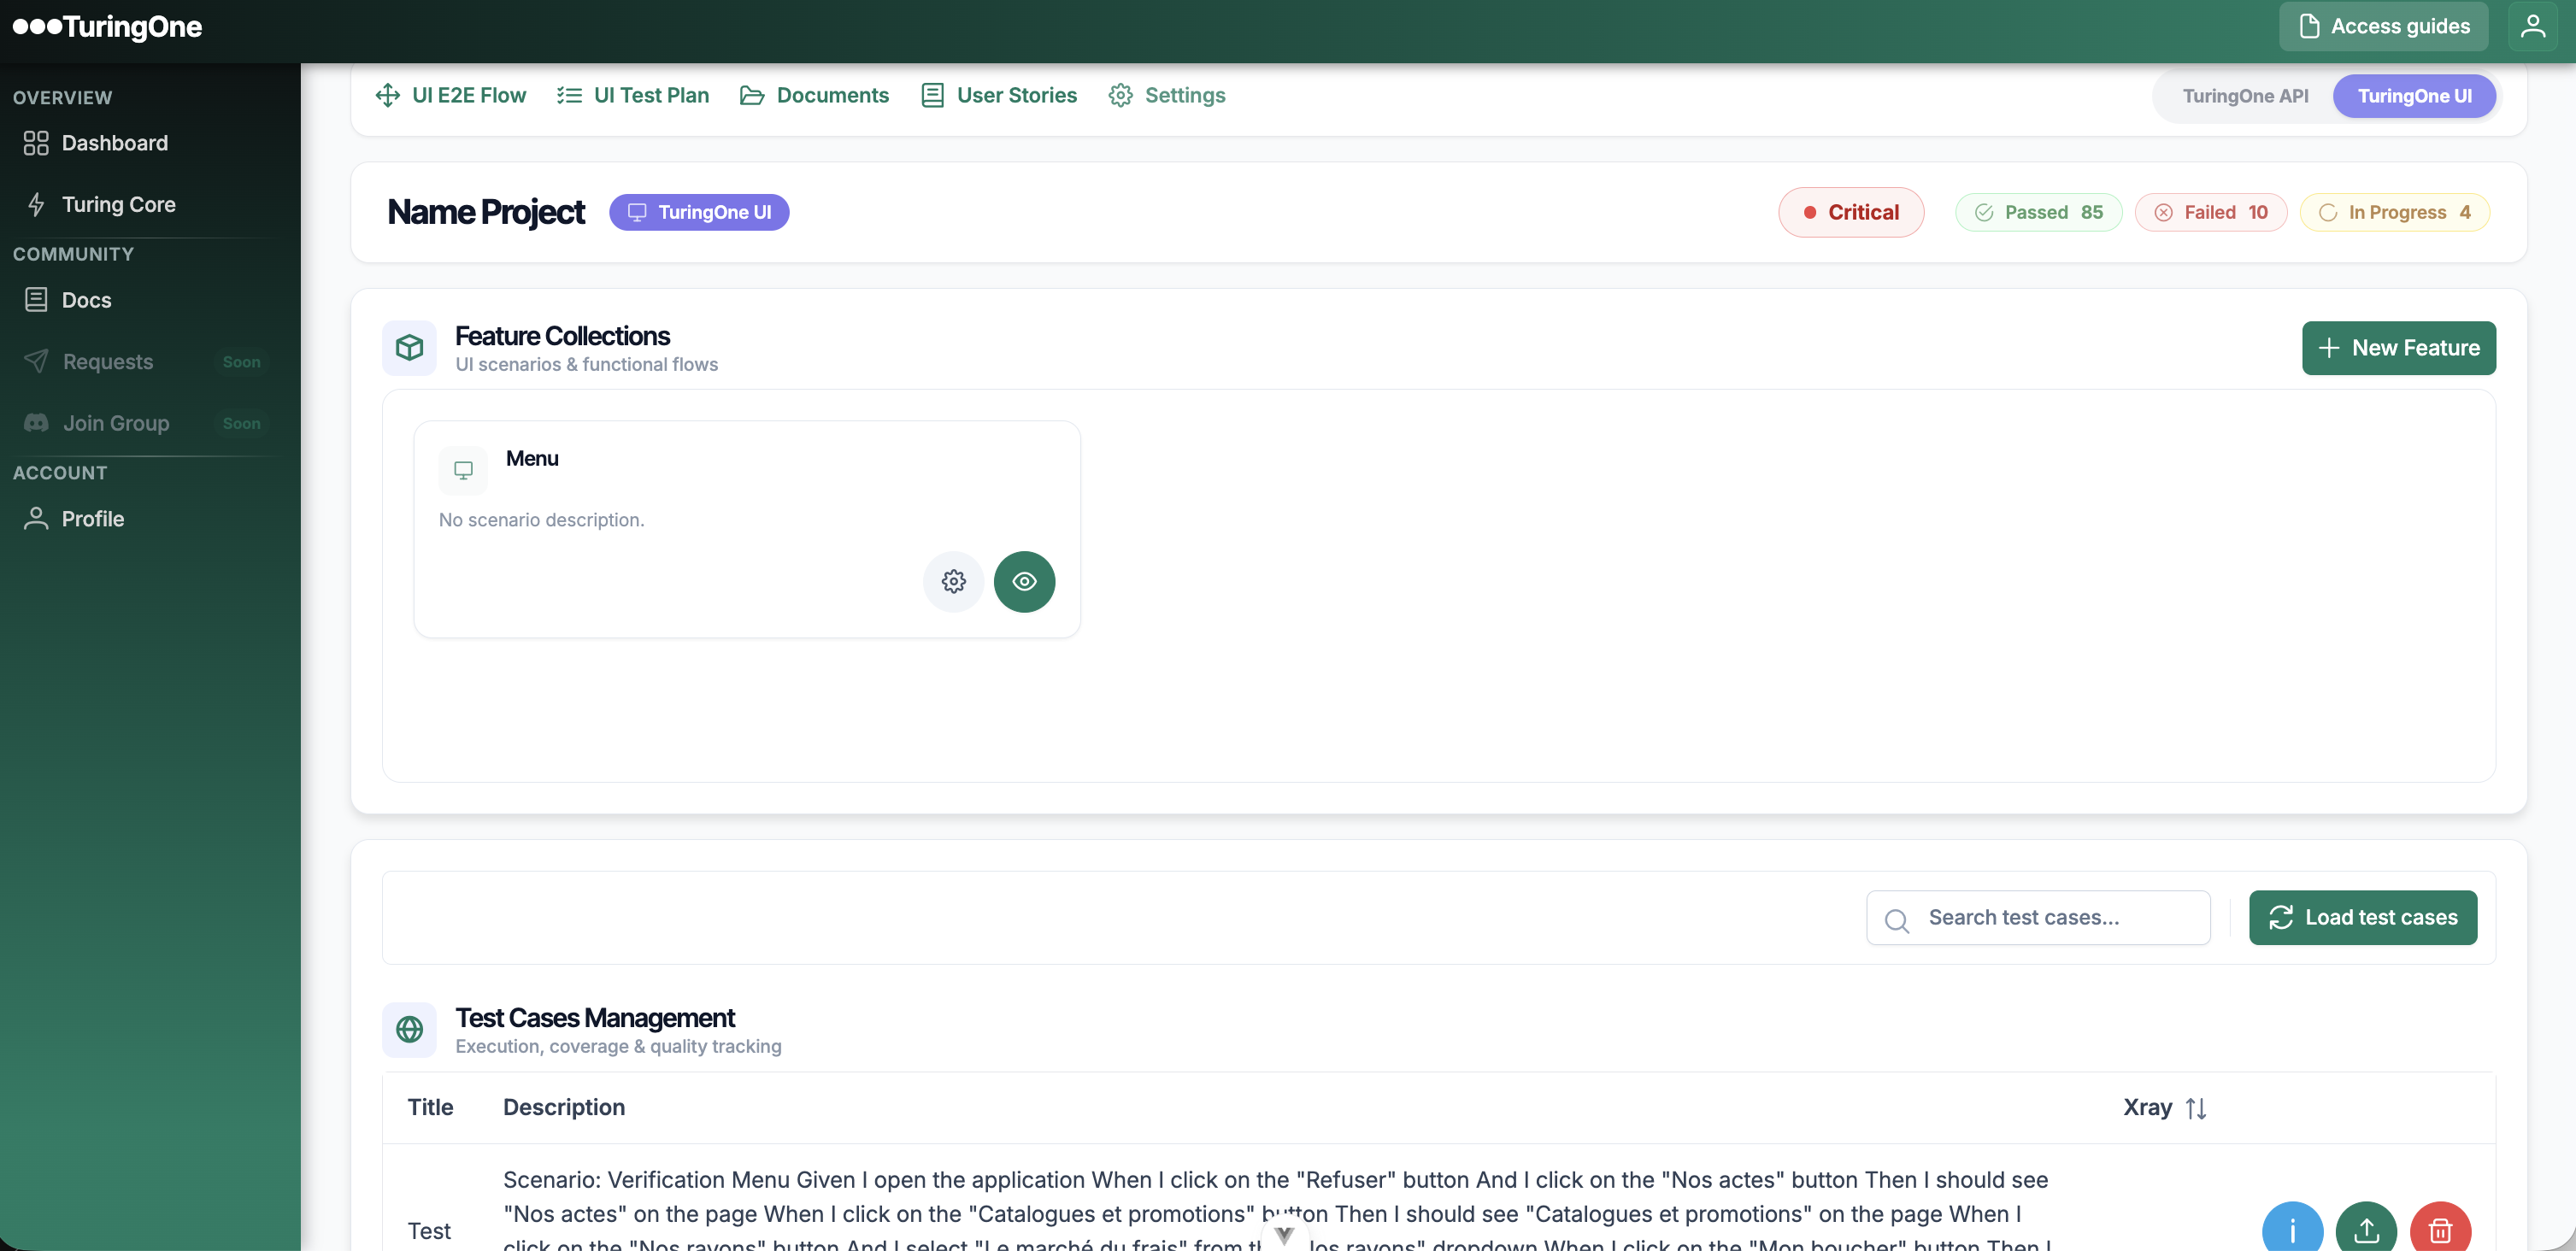
9.1.1 Feature Creation
A UI feature corresponds to a business functionality of the interface, for example:
To create a UI feature:
The feature then becomes a logical container for UI scenarios.
9.1.2 Functional Structuring
Feature-based structuring allows:
Each feature groups:
9.2 UI Scenario Creation
UI scenarios describe the actions a user performs on the interface.
9.2.1 Step Description
Each UI scenario is composed of steps described in a functional way, for example:
These descriptions are intentionally:
TuringOne's AI interprets these steps and makes them automatically executable.
9.2.2 User Actions
User actions include in particular:
TuringOne relies on:
This reduces dependency on fragile technical selectors.
Additionally, users can import an existing test case from Xray.
Creation and Validation of a BDD Scenario
When the user writes a test case and clicks the Validate button, TuringOne analyzes the provided description and automatically reformats it into a BDD scenario, following Behavior Driven Development (BDD) best practices.
The scenario is structured using a standard, readable, and maintainable format, for example:
This reformulation allows:
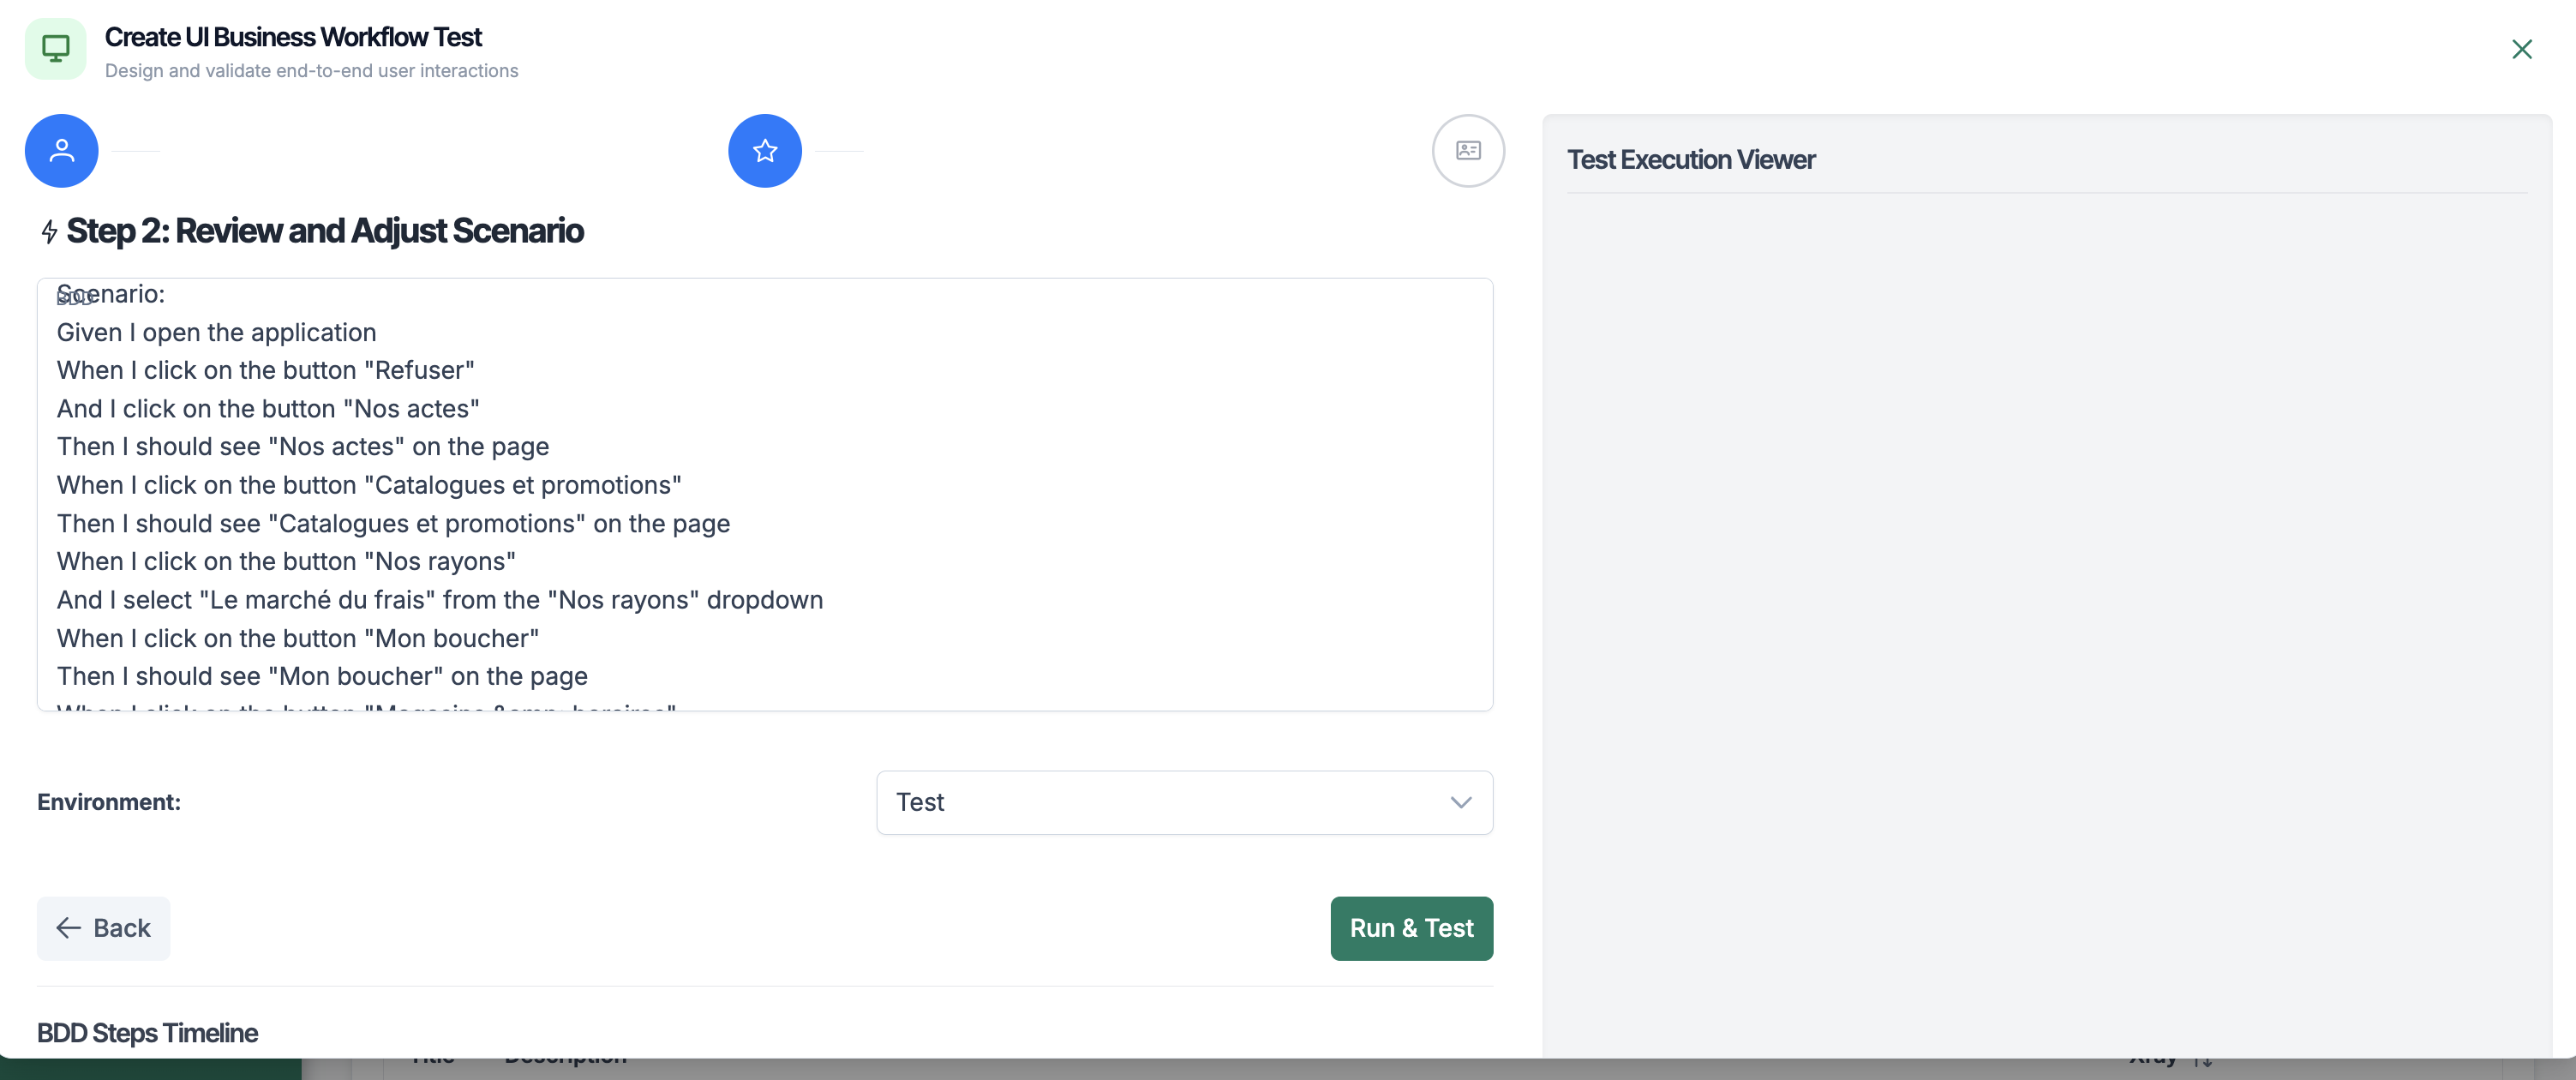
Scenario Execution for Validation
Once the BDD scenario is generated, the user can execute the test case to verify that:
Real-Time Execution (Run & Test)
When the user clicks the Run & Test button, the scenario is executed in real time.
During execution, the user can:
This real-time execution enables:
Final Test Case Validation
Once execution is completed and deemed correct, the user can click the Validate button to:
From this point on:
This approach ensures that only functionally validated tests are retained.
User Workflow Summary
This workflow combines artificial intelligence, BDD best practices, and human validation to ensure reliable and actionable tests.
10. API Security Module
The API Security module automatically identifies potential vulnerabilities exposed by APIs, starting from the testing phases.
In TuringOne, security is natively integrated into the testing lifecycle, without requiring complex external tools.
This module follows a Shift Left / DevSecOps approach.
10.1 Launching Security Tests
API security tests can be triggered on demand, on all or part of the project's APIs.
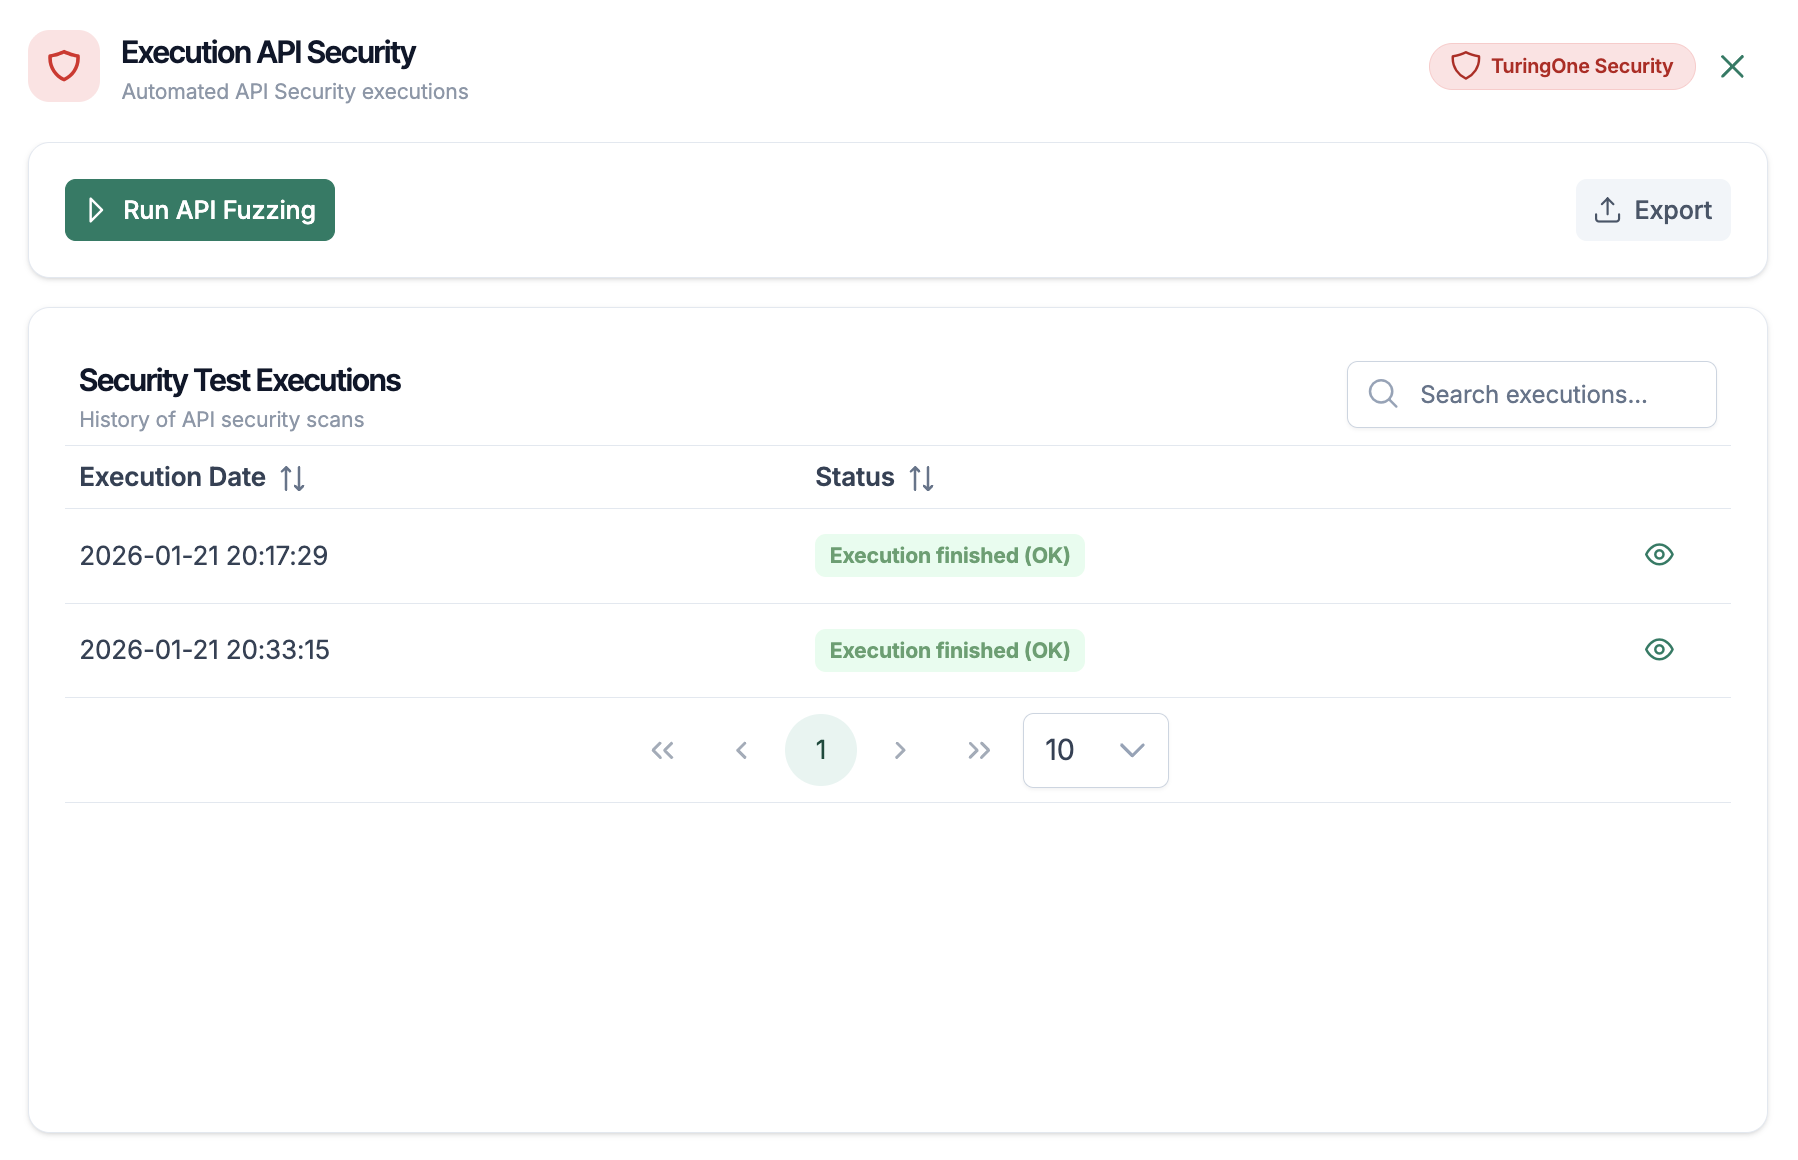
The user clicks on the “API Security” menu, then clicks the “Run API Fuzzing” button.
Types of Tests
TuringOne automatically executes several categories of security tests, including:
The tests are adapted to:
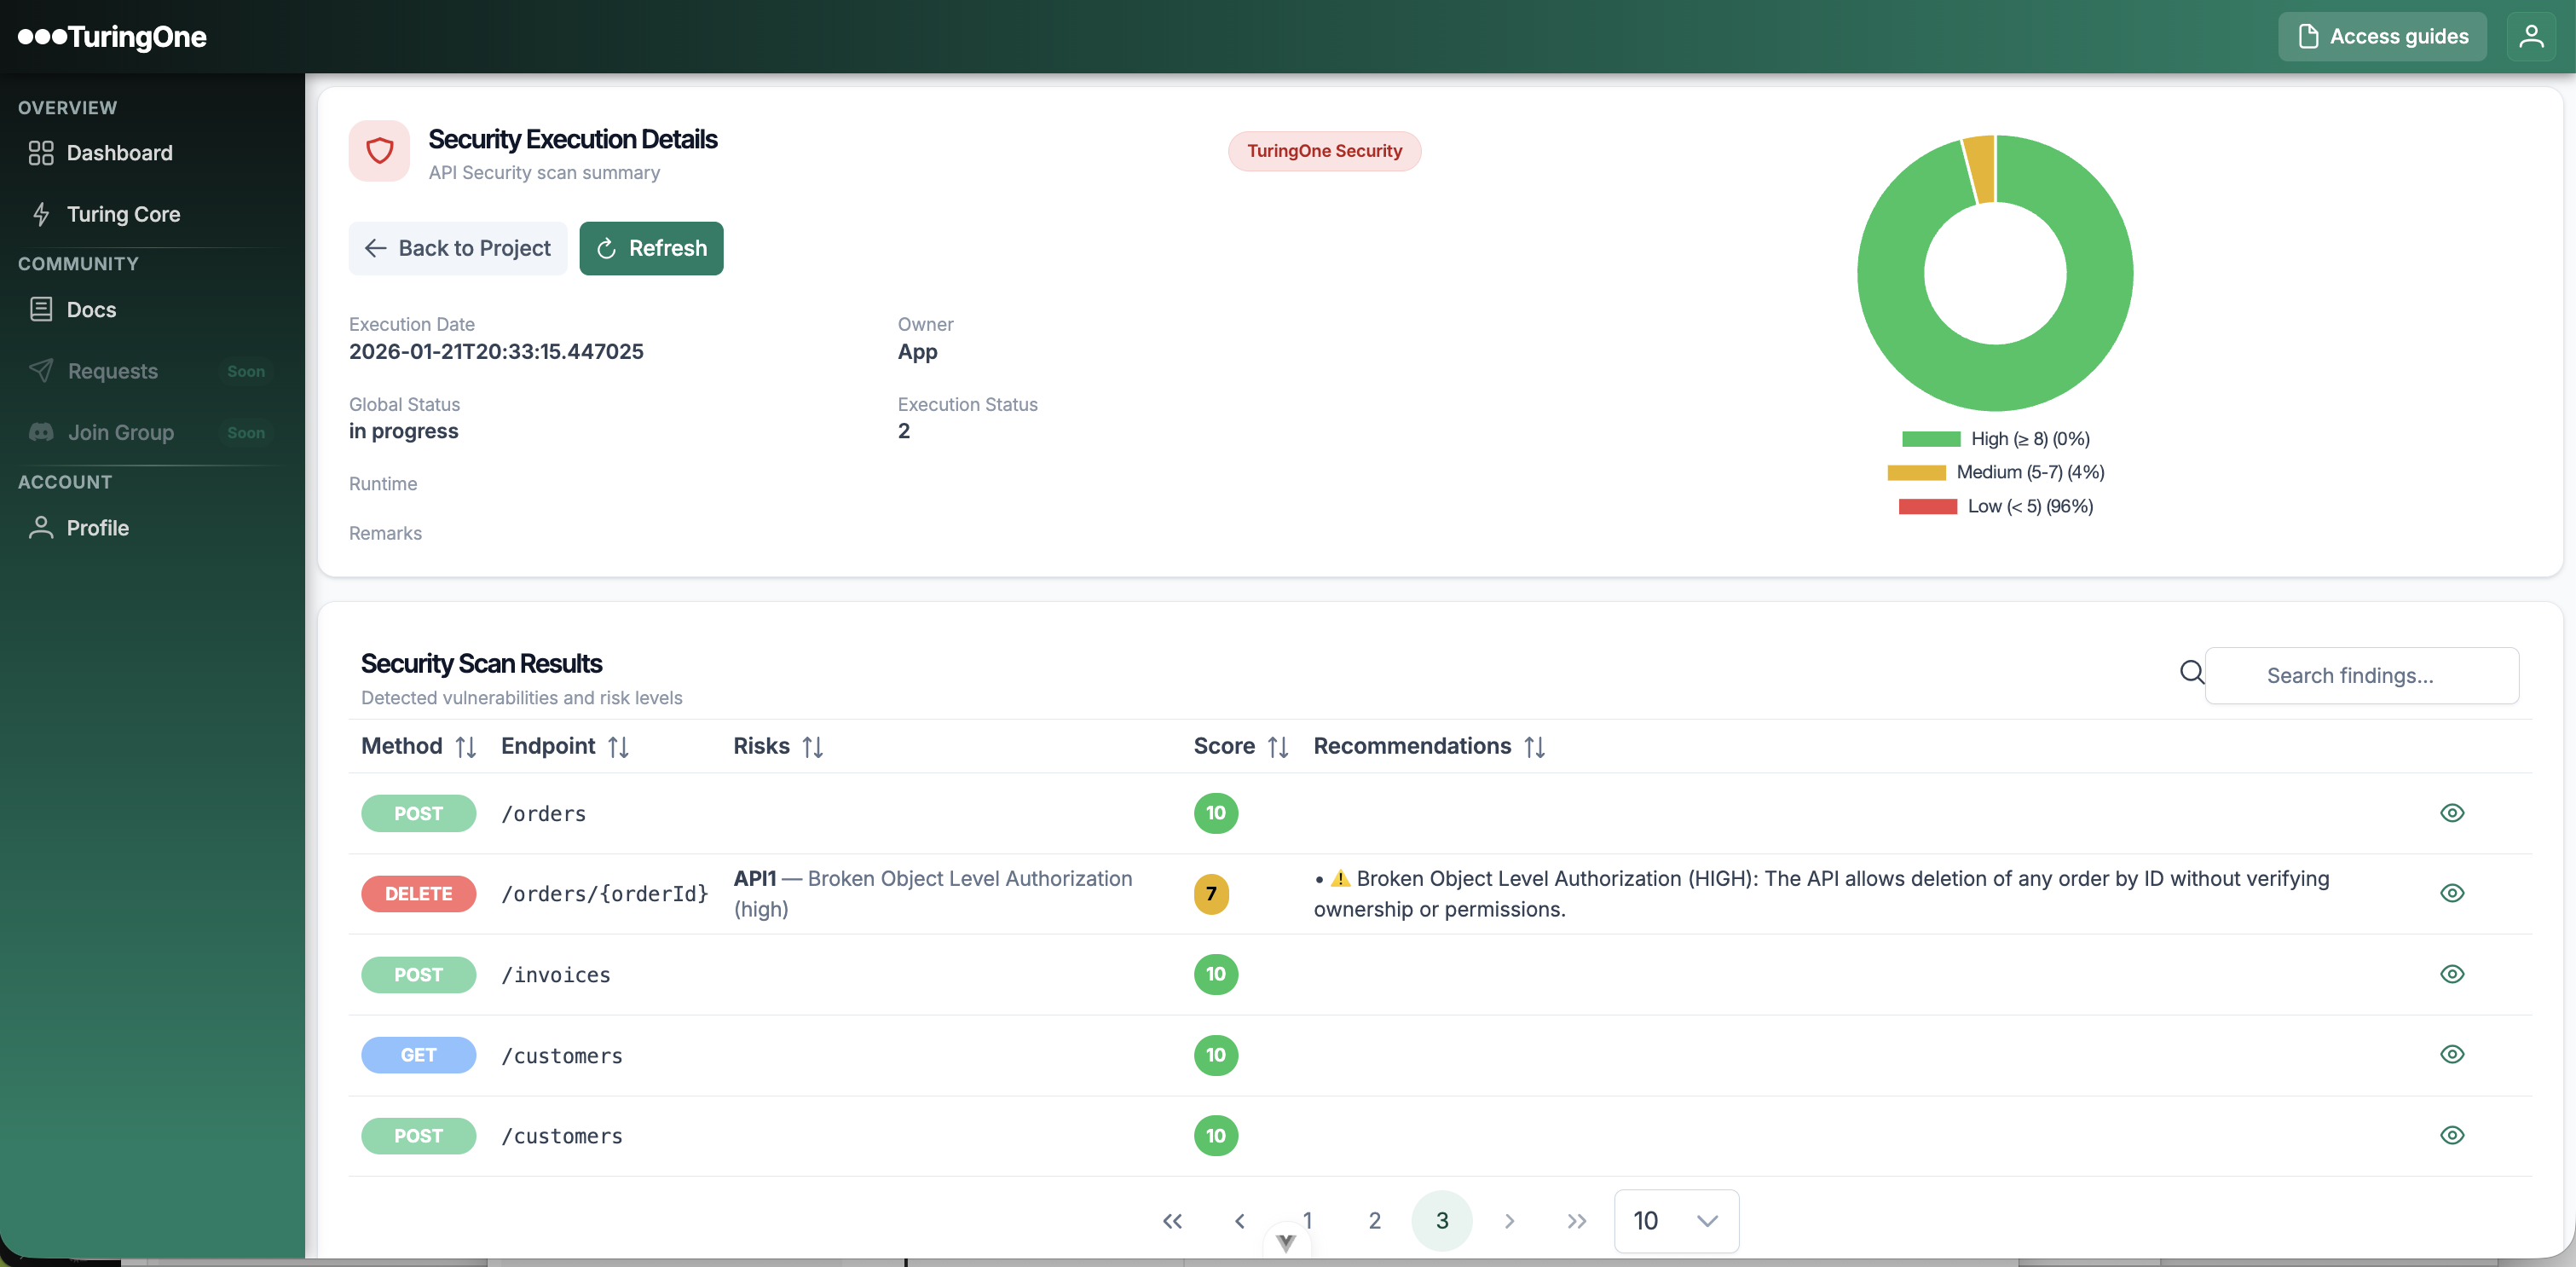
10.2 Vulnerability Analysis
After execution, TuringOne provides a structured and actionable analysis of the detected vulnerabilities.
Detected Vulnerabilities
For each vulnerability, the user can review:
Vulnerabilities are presented in a way that is:
Severity
Each vulnerability is associated with a severity level, for example:
This classification enables:
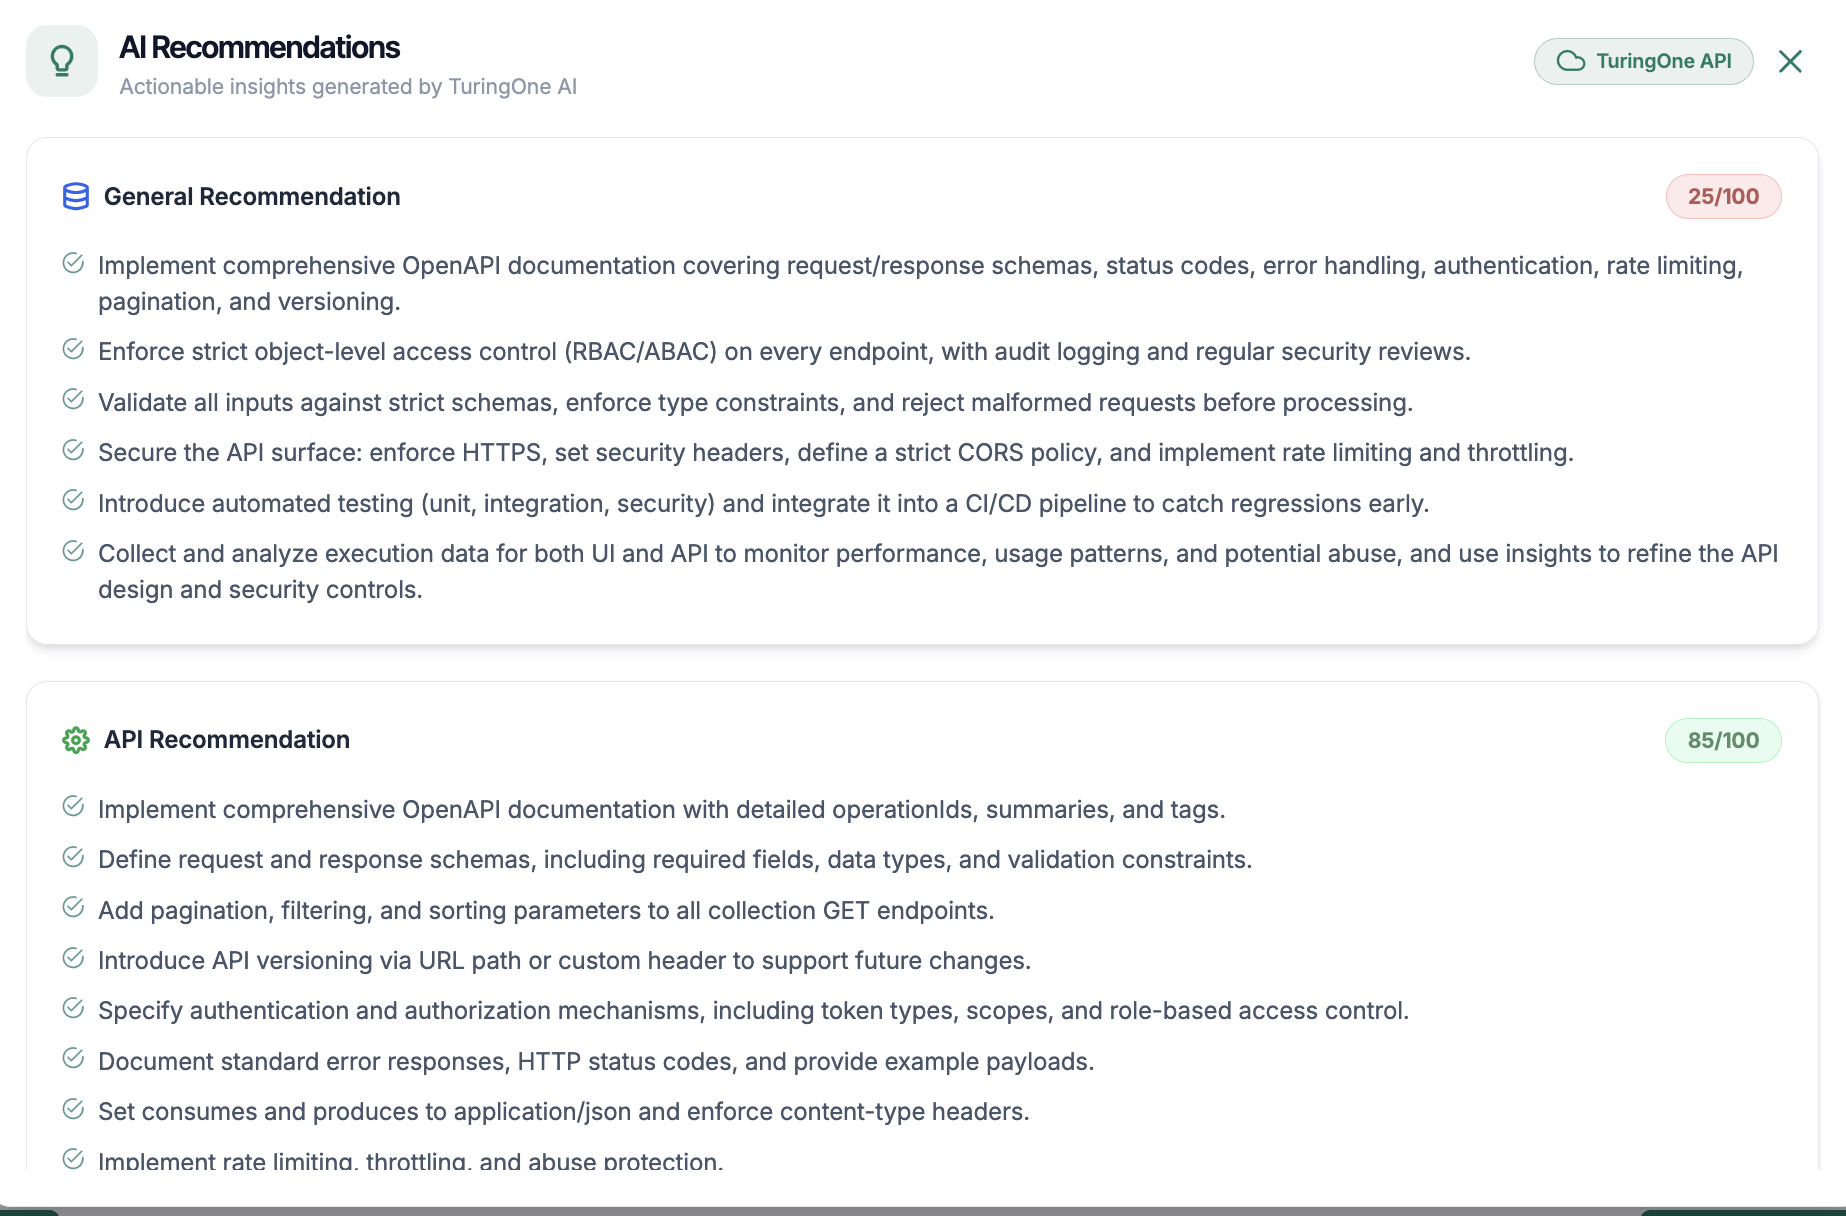
10.3 AI Recommendations
Beyond detection, TuringOne delivers real added value through its AI-powered recommendations.
Explanations
For each vulnerability, the AI provides:
These explanations enable:

Corrective Actions
TuringOne also proposes concrete corrective actions, such as:
These recommendations are:
11. Reporting & Analysis Module
The Reporting & Analysis module transforms raw test results into actionable insights for technical, quality, and business teams.
In TuringOne, reporting goes beyond simply indicating whether things work. It helps understand what works, what causes issues, and where to act first.
11.1 Report Generation
TuringOne enables the generation of consolidated reports based on:
11.1.1 Test Results
Test result reports present:
These results can be viewed:
The objective is to provide a clear and concise view of the overall quality status.
11. Module Reporting & Analysis
The Reporting & Analysis module transforms raw test results into actionable insights for technical, QA, and business teams.
In TuringOne, reporting goes beyond simply stating whether tests passed or failed. It helps teams understand what works, what causes issues, and where to act first.
11.1 Report Generation
TuringOne generates consolidated reports based on:
11.1.1 Test Results
Test result reports present:
These results can be reviewed:
The goal is to provide a clear and concise view of overall quality.
11.2 Indicator Analysis
The indicators provided by TuringOne are designed to be understandable for all profiles, not only technical experts.
11.2.1 Quality
Quality indicators help assess:
They help answer the question:
Does the application behave as expected?
11.2.2 Stability
Stability measures:
These indicators help detect:
11.2.3 Security
Security indicators summarize:
They help answer the question:
What is the current risk level of the application?

11.3 Business Usage
TuringOne reporting is designed to be directly usable by business teams, without requiring complex technical translation.
11.3.1 Decision Support
The reports allow teams to:
They provide a factual basis for decision-making, reducing:
11.3.2 Prioritization
Thanks to consolidated indicators, teams can:
TuringOne helps teams focus their efforts where they have the greatest business impact.
Automatic Change Analysis
After an update:
This ensures that functional understanding remains continuously up to date, without manual effort.
12. Change Management
Change management is a major challenge in any application project. TuringOne is designed as a living reference, capable of detecting, analyzing, and absorbing changes without starting over.
This module helps control the impact of changes on quality, testing, and security.
12.1 Document Updates
Functional documents evolve regularly (new business rules, clarifications, corrections).
Updating a Document
To update an existing document:
TuringOne keeps the document as the functional source of truth.

12.2 Definition API Update
APIs evolve frequently: new endpoints, modified parameters, and adjusted behaviors.
Updating a Swagger
To update an existing Swagger:
Change Detection
TuringOne automatically detects:
This detection allows you to immediately visualize the technical evolution of the system.
12.3 Automatic Impact on Tests
One of the key advantages of TuringOne is the automatic impact management of changes.
Link Updates
Following a modification:
Test Updates
Depending on the nature of the change, TuringOne can:
This allows teams to:
12.4 History and Traceability
TuringOne maintains a complete history of all project changes.
Tracked Elements
The history notably includes:
Value of Traceability
This traceability enables:
It is particularly useful in the following contexts:
Best Practices for Using TuringOne
1. Project Structuring
2. Documentation Before Automation
3. Regular Synchronization
4. API Tests First, UI Tests Second
5. Leverage End-to-End Scenarios
6. Continuous Security
7. Intelligent Report Analysis
Focus on: